So you might be wondering? How do you apply styles to HTML? When you want to apply styles to your HTML markup, there are three different ways to go about it, each with their pros and cons. Let's go through each one.
Inline Styles
Inline styles are styles that are within the lines of HTML. To style an HTML tag, you use the style attribute, with the value being your CSS.
In our setup example, let's say we wanted our header h1 to be blue. Here's how you would do that inline:
HTML<!DOCTYPE html>
<html>
    <head>
        <title>Applying CSS Styles</title>
    </head>
    <body>
        <h1 style="color: blue;">I am a blue header.</h1>
        <h2>I am a subheader.</h2>
        <p>I am a paragraph.</p>
    </body>
</html>
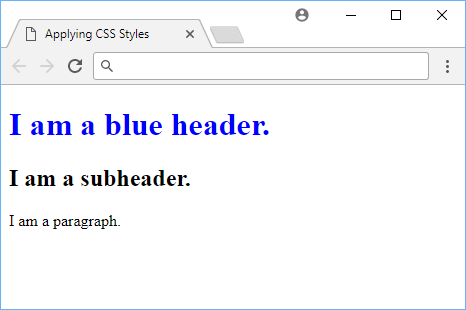 Example of inline styles.
Inline styles are great for styling elements that are within the HTML markup, but they are not as powerful or flexible as other methods of applying CSS styles.
Internal Styles
Internal styles are styles placed in the head tag and are applied to the entire page. Unlike inline styles which only affect the element they are placed on, internal styles have the potential to affect multiple elements.
Creating your own internal styles is as easy as placing a style tag inside your head tag, and then placing your styles inside that. Let's say you wanted to make the text inside h2 tags green, you can do this:
HTML<!DOCTYPE html>
<html>
    <head>
        <title>Applying CSS Styles</title>
        <style>
            h2 {
                color: green;
            }
        </style>
    </head>
    <body>
        <h1 style="color: blue;">I am a blue header.</h1>
        <h2>I am a green subheader.</h2>
        <p>I am a paragraph.</p>
    </body>
</html>
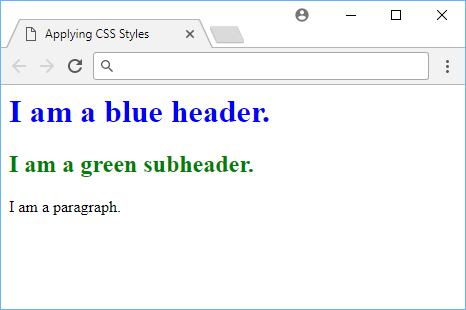 Example of internal styles.
Internal styles are considered better than inline styles for the main reason that you can target multiple elements, instead of just one. Not to mention that they are separate. Internal styles are in the head tag and inline styles are mixed in directly with HTML.
Still, we want true separation, and the only way to achieve that is to have our styles in their own CSS file.
External Styles
External styles are exactly the same as internal styles except that they live in a separate file, as opposed to inside the same HTML file.
In the same folder as your index.html file, make a new file and save it as styles.css. If you wanted to make paragraphs red, put this inside styles.css and save.
CSSp {
    color: red;
}
Now we need to tell our HTML file to use this styles file. We do that by adding this line to our head tag:
HTML<link rel="stylesheet" href="styles.css">
This tells our browser not only that this is a CSS file, but also where to look for it via the href attribute. Your HTML file should now look like this:
HTML<!DOCTYPE html>
<html>
    <head>
        <title>Applying CSS Styles</title>
        <link rel="stylesheet" href="styles.css">
        <style>
            h2 {
                color: green;
            }
        </style>
    </head>
    <body>
        <h1 style="color: blue;">I am a blue header.</h1>
        <h2>I am a green subheader.</h2>
        <p>I am a red paragraph.</p>
    </body>
</html>
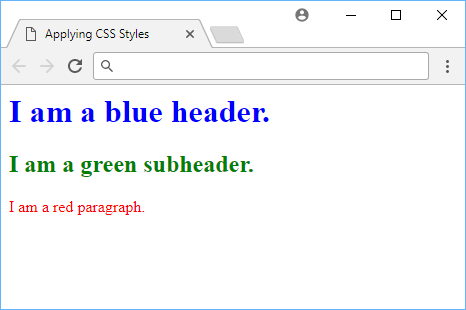 Example of external styles.
With external styles, we keep our HTML and CSS separate. We can even work on them independently. If you added another paragraph, that one would also be red. In addition, if you added more styles to styles.css, you would see those changes if you refreshed. This is because the browser is looking for the styles in the styles.css file, and not the index.html file.
Cascading
The "C" in CSS stands for cascading. Styles are said to cascade because they follow a specific hierarchy. We learned above three different ways to apply styles, but what if you tried to style the same element in each of three different ways?
The hierarchy that the browser will follow is external, internal, then inline. Technically speaking, all of the styles will apply, but only the inline styles will win in the end. There is one exception, however, and that is when you use the important rule.
Important Rule
The important rule is an exception that you can apply to your styles that tells the browser "make this CSS rule apply, no matter what". It is generally frown upon to be used unless absolutely necessary because it violates the cascading nature of CSS.
To use the important rule, simply add !important at the end of your style:
HTML<!DOCTYPE html>
<html>
    <head>
        <title>!important</title>
        <style>
            .special h1 {
                color: red;
            }
            h1 {
                color: blue !important;
            }
        </style>
    </head>
    <body>
        <div class="special">
            <h1>I like bacon.</h1>
        </div>
    </body>
</html>
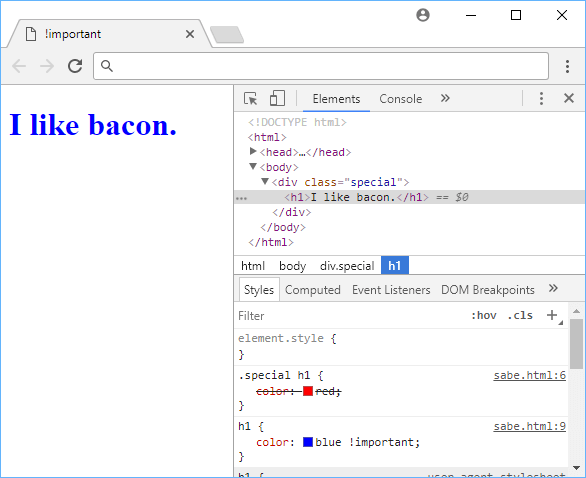 Example of using important in CSS.
Even though we specified that we wanted all h1 tags inside special classes be the color red, the text ended up being blue despite the selector being less specific because of the !important usage. This is because the !important rule overrides the less specific rule.
Resources
 Getting Started with Express
 Git Tutorial: Learn how to use Version Control
 How to deploy a .NET app using Docker
 How to deploy a Deno app using Docker
 Getting Started with Deno
 How to deploy an Express app using Docker
 How to Scrape the Web using Node.js and Puppeteer
 Getting Started with Handlebars.js
 Getting User Location using JavaScript's Geolocation API
 Learn how to build a Slack Bot using Node.js
 Creating a Twitter bot with Node.js
 Building a Real-Time Note-Taking App with Vue and Firebase