Docker is a popular open-source technology for running applications in a containerized environment. This is useful because it allows you to easily scaffold and deploy applications to any platform that supports Docker. In this tutorial, we will learn how to deploy a MySQL server in a Docker container. We will do this by building a Docker image and run it as a container.
What is MySQL?
Before we begin, let's quickly go over what MySQL is and why it is useful. MySQL is a popular open-source relational database management system. It is used to store data in a relational database. It is a popular choice for web applications because it is easy to deploy and it is easy to scale. Running it in Docker is useful because it makes it easy to run it on any platform that supports Docker.
Prerequisites
- Basic ability to use a command line interface
Installing Docker
You will need to install Docker.
- Visit the official Docker website to get the installer.
- After it downloads, run the installer until the end.
- Restart your computer to ensure the changes can take effect.
 The Docker installer.
Directory Structure
By the end of this tutorial, our server will be in the following directory structure:
BASHmysql
├── .env
├── docker-compose.yml
├── data
├── logs
├── conf.d
|   └── my.cnf
└── Dockerfile
As you can see, you'll only need a few files to make this work.
Docker Overview
Before we continue, let's run through a quick overview of how Docker works. As said before, Docker is a containerization technology that makes it easy to create, deploy, and run applications inside containers.
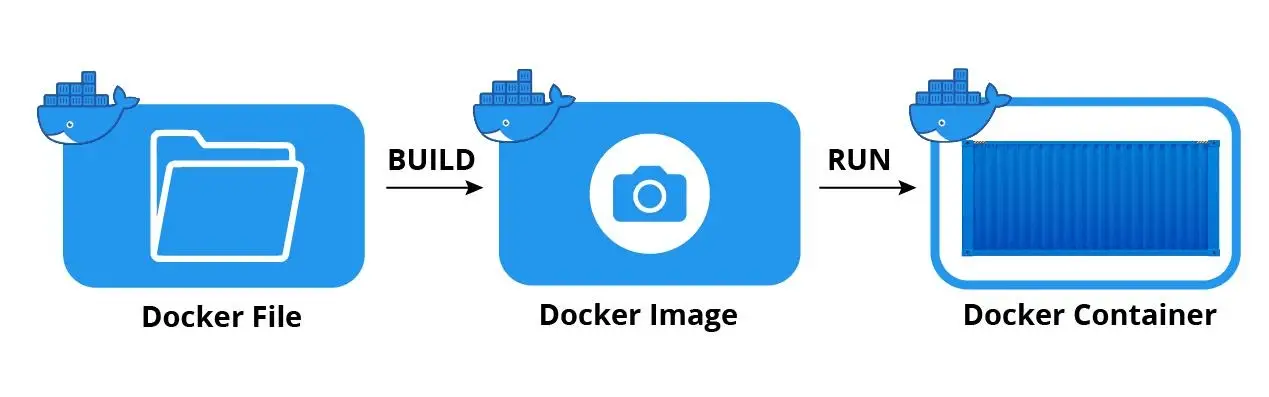
A Docker container is a lightweight, portable, and isolated unit of software. It is a single process that runs on a single computer. It is designed to run a specific application, such as a web server, or a database.
A Docker image is a blueprint for a Docker container. It is a collection of files and commands that can be used to create a Docker container, and it is stored inside of a file called Dockerfile. The instructions in this file are used to create an image.
 Docker overview
Docker Compose
Now that we have an app to deploy and the basic terms for Docker defined, let's deploy it on a Docker container. There are several ways to do this, but the easiest way is to use the Docker Compose tool. It comes with Docker, so you should already have access to it.
Create a file named docker-compose.yml in the root directory of your folder.
YMLversion: "3.9"

services:
    mysql:
        container_name: mysql
        image: mysql
        restart: always
        build:
            context: .
            dockerfile: Dockerfile
            target: base
        environment:
            MYSQL_ROOT_PASSWORD: ${DATABASE_PASSWORD}
        volumes:
            - ./data:/var/lib/mysql
            - ./logs:/var/log/mysql
        ports:
            - ${PORT}:${PORT}
        expose:
            - "${PORT}"
Let's breakdown what's going on here. This file tells Docker to create a service called mysql that runs the image mysql with container name mysql and exposes the port that we will later set to 3306. The actual instructions for building the image are in the Dockerfile file.
We have a variable here, DATABASE_PASSWORD. This is used to set the password for the MySQL server.
We are also mounting two volumes, ./data and ./logs. This is where we will store the data of the MySQL server and where we will store the logs. This allows us to easily access the data and logs of the MySQL server between deployments.
Dockerfile
Create a file named Dockerfile in the root directory of your folder.
DOCKERFILEFROM mysql:latest as base

COPY ./conf.d/my.cnf /etc/mysql/conf.d/
When you take it line by line, it's actually straightforward.
DOCKERFILEFROM mysql:latest as base
This tells Docker to get the latest version of the mysql Docker image and name this image base.
DOCKERFILECOPY ./conf.d/my.cnf /etc/mysql/conf.d/
This tells Docker to copy our my.cnf file to the /etc/mysql/conf.d/ directory so that the MySQL server can read it.
Env file
Before we can deploy our server on a Docker container, we need to set up the environment variables that we will need to run the server. Create a file named .env in the root directory of your folder.
Since we defined the port as a variable in the docker-compose.yml file, we need to set the port in the .env file.
BASHPORT=3306

DATABASE_HOST=mysql
DATABASE_USERNAME=root
DATABASE_PASSWORD=password
This sets the port, the host, the username, and the password for the database.
MySQL Config File
Create a file named my.cnf in the conf.d directory and add the following to it:
BASH[mysqld]
general_log = 1
general_log_file = /var/log/mysql/query.log

slow_query_log = 1
long_query_time = 1
slow_query_log_file = /var/log/mysql/slow.log
log_queries_not_using_indexes = 0
These are just example settings. Feel free to change them to your liking.
Running the Server
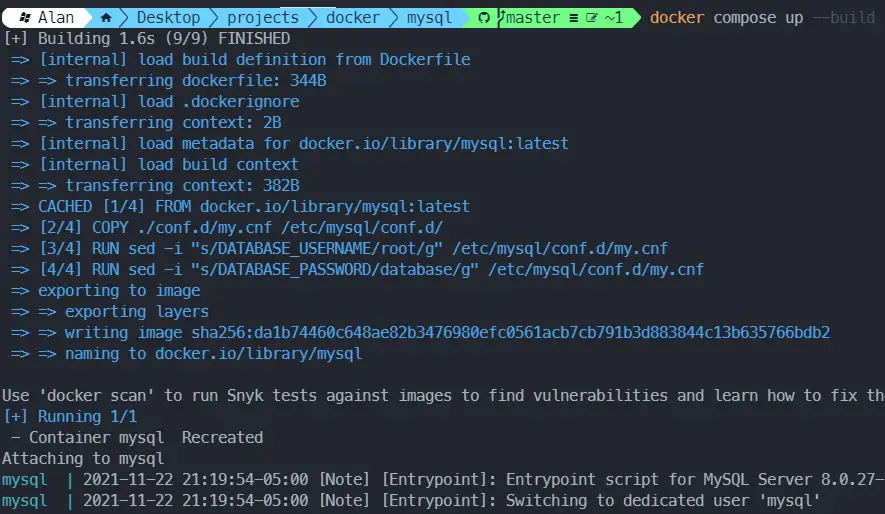
Finally we are ready to deploy our MySQL server on a Docker container. To do so, use Docker Compose.
BASHdocker compose up --build
On the first build, you don't need the build flag, but you will in subsequent runs. If successful, you should see something like this:
 The Docker Compose output.
The container is now running and accessible at port 3306.
You can confirm the container is running in Docker, along with all of the other containers that are running by using the docker ps command.
BASHdocker ps
BASHCONTAINER ID IMAGE COMMAND                CREATED       STATUS       PORTS                             NAMES
efd1a3867917 mysql "docker-entrypoint.s…" 5 seconds ago Up 5 seconds 0.0.0.0:3306->3306/tcp, 33060/tcp mysql
You can stop the running container by then running docker compose down.
Conclusion
Docker is a powerful tool for a developer to learn and use. As you saw, with just a few lines in your Dockerfile, you can set up a full-blown MySQL server. This makes deploying the server anywhere you want a breeze. I hope this tutorial has helped you get a better understanding of Docker and Docker Compose. Happy deploying!
 Docker's hot for a reason though!
Resources
 Getting Started with Solid
 Managing PHP Dependencies with Composer
 Getting Started with Svelte
 Getting Started with Express
 How to deploy a .NET app using Docker
 How to deploy a Node app using Docker
 Getting Started with Sass
 How to Scrape the Web using Node.js and Puppeteer
 Learn how to build a Slack Bot using Node.js
 Building a Real-Time Note-Taking App with Vue and Firebase
 Getting Started with React
 How To Create a Modal Popup Box with CSS and JavaScript