
In this tutorial, we will learn how to use the Google-built Puppeteer library to control an instance of headless Chrome and the Facebook-built Jest JavaScript testing library to write and run end-to-end testing suites. End-to-end testing is an important because it helps ensure your application is working properly from the perspective of your users.
Prerequisites
- Basic JavaScript knowledge is needed. If you need a refresher, check out our class on JavaScript.
- Node and NPM installed. If you don't have them installed, follow our how to install Node guide.
Installing Puppeteer, Jest, and Jest-Puppeteer
Installing all three packages is as simple as running the npm install command:
BASHnpm install puppeteer jest jest-puppeteer --save-dev
If you do not already have a package.json file, create it by running this command:
BASHnpm init
Now that we have our libraries installed, let's configure them both.
Configuring Jest
To configure Jest, create a file named jest.config.js in your root folder.
Inside that file, add:
JAVASCRIPTmodule.exports = {
    preset: "jest-puppeteer",
    globals: {
        URL: "https://sabe.io"
    },
    testMatch: [
        "**/test/**/*.test.js"
    ],
    verbose: true
}
This tells Jest to use the jest-puppeteer preset that we installed, defines the base URL that we want our test to run against, in this case, https://sabe.io, and then the directory to find our tests in.
Create a folder named src, and then inside it another folder named test. This folder is where all of our tests are going to reside inside.
Configuring Jest-Puppeteer
Now can move on to configuring our jest-puppeteer preset. Create a file named jest-puppeteer.config.js in your root folder and place this inside that file:
JAVASCRIPTmodule.exports = {
    launch: {
        headless: true,
        slowMo: false,
        devtools: true
    }
}
This configuration turns headless on so that a browser does not actually launch to perform the test, and turns slowMo off. However, you are free to set these values to whatever you like.
Configuring Scripts
The last thing we need to do is add a script to run all our tests when we are ready to run them. Open your package.json file and make sure that you have something similar to this inside:
JAVASCRIPT"scripts": {
    "test": "jest || exit 0"
}
This makes it so that Jest is called when we want to run our tests and I personally like to exit with a code of 0 no matter what because my logs are cleaner however if you want to let the default behavior run instead, remove the || exit 0 part.
Writing our End-to-End Tests
Now we have everything set up and configured, we can move on writing our very first test suite. Inside your test folder, create a file named homepage.test.js. For the sake of this tutorial, we will be testing two things, a page's title and h1 tag contents. Place this code inside:
JAVASCRIPTconst timeout = 10000;

beforeAll(async () => {
    await page.goto(URL, { waitUntil: "domcontentloaded" });
});

describe("Test title and header of the homepage", () => {
    test("Title of the page", async () => {
        const title = await page.title();

        expect(title).toBe("Learn Web Development with free Classes and Tutorials - Sabe.io");
    }, timeout);

    test("Header of the page", async () => {
        const h1Handle = await page.$("h1");
        const [html](https://sabe.io/classes/html) = await page.evaluate(h1Handle => h1Handle.innerHTML, h1Handle);

        expect(html).toBe("Become a better developer");
    }, timeout);
});
The awesome thing about both Puppeteer and Jest is that the resulting code for a test is pretty straightforward and readable. There's a function named beforeAll that, as the name suggests, performs some kind of action before any of the tests are run. In this case, we are simply telling Puppeteer to go to the defined URL and wait until the content has loaded so that the tests can begin.
Then we are defining a test suite to test the title and header of the homepage. Inside the suite is a test that checks the title of the page, and another that checks the content in the page's h1 tags.
In both tests, we are using Puppeteer to get the values, then using Jest to confirm that they are what we expect them to be. Finally, we had a timeout value just in case the test takes particularly long.
We are now ready to run these tests!
Running our End-to-End Tests
Running the tests we just wrote is dead simple. Because of the script we defined in our package.json file, simply open command prompt/terminal at your root folder and run:
BASHnpm run test
After a few seconds, you should see something very similar to this:
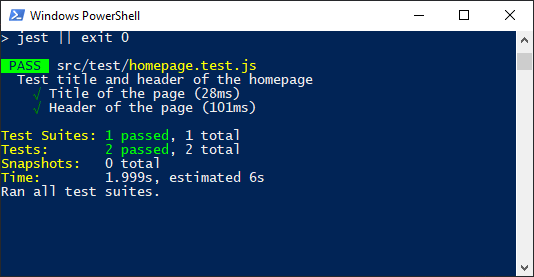 The results of running our end-to-end Jest tests.
BASHPASS  src/test/homepage.test.js
Test title and header of the homepage
  √ Title of the page (28ms)
  √ Header of the page (101ms)

Test Suites: 1 passed, 1 total
Tests:       2 passed, 2 total
Snapshots:   0 total
Time:        1.999s, estimated 6s
Ran all test suites.
Conclusion
The combination of Puppeteer and Jest make for a powerful testing environment that can perform and test basically any operation that a normal user can do. The two make writing and running end-to-end tests a breeze and help ensure that our application or website is functioning as we intend it to.
Resources
- Puppeteer on GitHub
- Puppeteer on npm
- Puppeteer on Google Developers
- Jest Homepage
- Jest Github
- Jest on npm
- Puppeteer on Jest
 Managing PHP Dependencies with Composer
 Git Tutorial: Learn how to use Version Control
 How to deploy a .NET app using Docker
 How to deploy an Express app using Docker
 How to deploy a Node app using Docker
 Getting Started with Sass
 Learn how to use v-model with a custom Vue component
 How to Scrape the Web using Node.js and Puppeteer
 Build a Real-Time Chat App with Node, Express, and Socket.io
 Getting Started with Moment.js
 Creating a Twitter bot with Node.js
 Setting Up a Local Web Server using Node.js