The Notifications API for the web gives us the ability to send custom notifications to our users that we can control using JavaScript. As you might already know, notifications are used to alert the user about important information, and in this tutorial we'll learn how to send them ourselves.
Setup
Since there isn't too much to sending custom notifications, this will be a relatively simple project. However, it will require a web server of some kind, and if you don't already have one, this tutorial shows you how to set up a local one using Node.
Our app is going to be pretty simple, just a button to request permissions to send notifications, then another button that actually sends the notification.
Feel free to check out the demo before we begin. Here is a picture of how it looks:
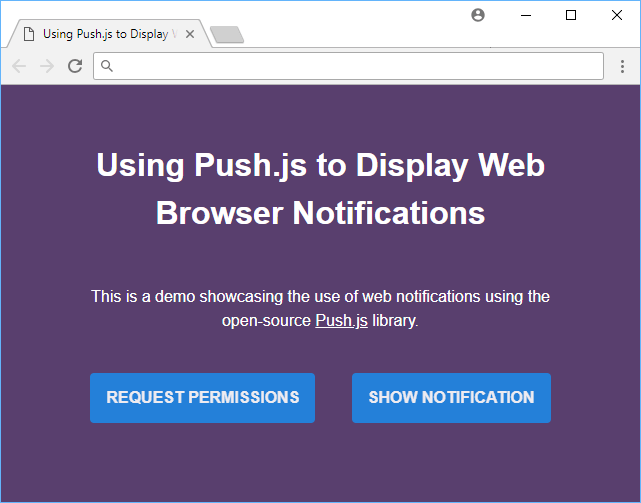 A demo using Push.js
To make things simpler, instead of working with the native Notifications API, we'll be using the open-source library Push.js, which adds a thin wrapper around the native API that makes working with notifications much easier.
Let's start with a bare-bones index.html:
HTML<!DOCTYPE html>
<html>
    <head>
        <title>Using Push.js to Display Web Browser Notifications</title>
    </head>
    <body>
        <h1>Using Push.js to Display Web Browser Notifications</h1>
        <p>This is a demo showcasing the use of web notifications using the open-source <a href="https://github.com/Nickersoft/push.js" target="_blank">Push.js</a> library.</p>
        <button class="request-button">Request permissions</button>
        <button class="show-button">Show notification</button>
    </body>
</html>
So far this is what you should see:
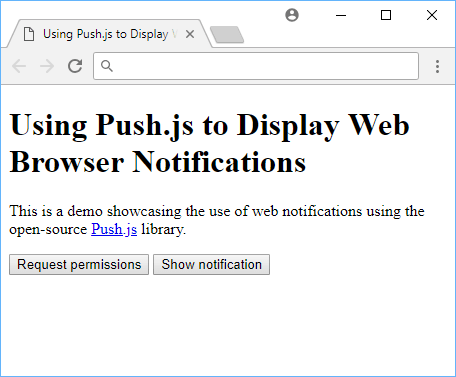 Bare-bones Push.js demo
If you've done that so far, congrats, you can move on to requesting permission from the user.
Requesting Permission
First, import the Push.js library using a CDN link:
HTML<script src="https://cdnjs.cloudflare.com/ajax/libs/push.js/1.0.5/push.js"></script>
Now we are set up to use the Push.js library in our code. According to the library's docs, we can request permissions using
JAVASCRIPTPush.Permission.request(onGranted, onDenied);
onGranted and onDenied are both functions to be called if the user grants or denies our request to allow notifications. Inside a new file, javascript.js, place this:
JAVASCRIPTconst requestButton = document.querySelector(".request-button");

function onGranted() {
    requestButton.style.background = "green";
}

function onDenied() {
    requestButton.style.background = "red";
}

requestButton.onclick = function() {
    Push.Permission.request(onGranted, onDenied);
}
The request button will turn green if the user is cool with notifications and red if they're not. Of course, you can do whatever you want when they grant or deny the request. Import your javascript.js file, serve up your files using a web server of any kind, and click on the request button.
If done correctly, you should get this familiar dialog appear:
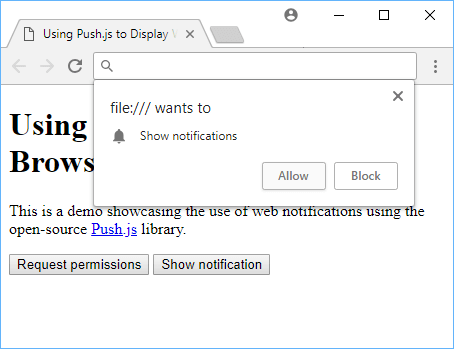 The notification request dialog.
Upon clicking Allow or Block, the button should change colors indicating your choice.
Creating a Notification
Now that we've asked the user for permission, we can send them a notification using Push's create function. All of the properties here should be self-explanatory, so we'll just show the code for it:
JAVASCRIPTPush.create("Hello from Sabe.io!", {
    body: "This is a web notification!",
    icon: "/icon.png",
    timeout: 5000,
    onClick: function() {
        console.log(this);
    }
});
This code creates and sends a new notification with a title of Hello from Sabe.io!, a body text of This is a web notification!, using an icon named icon.png, and automatically closes after 5,000 milliseconds. There is also a function you can pass in to execute code if the notification is clicked on, which in this case we just log the object to the console.
Here is a look at the notification:
 A web browser notification
Putting It All Together
Now that we have the code for a new notification, let's add it to our javascript.js file. The entire file should now look like this:
JAVASCRIPTconst requestButton = document.querySelector(".request-button");
const showButton = document.querySelector(".show-button");

function onGranted() {
    requestButton.style.background = "green";
}

function onDenied() {
    requestButton.style.background = "red";
}

requestButton.onclick = function() {
    Push.Permission.request(onGranted, onDenied);
}

showButton.onclick = function() {
    Push.create("Hello from Sabe.io!", {
        body: "This is a web notification!",
        icon: "/icon.png",
        timeout: 5000,
        onClick: function() {
            console.log(this);
        }
    });
};
Let's make things pretty by adding these styles in a new file called styles.css:
CSSbody {
    font-family: sans-serif;
    color: white;
    line-height: 1.5;
    text-align: center;
    padding: 2rem;
    background-color: #593f6e;
}
a {
    color: white;
}
h1 {
    max-width: 30rem;
    margin: 0 auto 3rem;
}
p {
    max-width: 30rem;
    margin: 0.5rem auto;
}
button {
    padding: 1rem;
    color: white;
    background-color: #1E88E5;
    outline: 0;
    border: 0;
    font-size: 1rem;
    text-transform: uppercase;
    cursor: pointer;
    opacity: 0.9;
    border-radius: 0.25rem;
    margin: 2rem 1rem 0;
    display: inline-block;
    font-weight: bold;
}
button:hover {
    opacity: 1;
}
After you import these new styles, your final index.html should look like this:
HTML<!DOCTYPE html>
<html>
    <head>
        <title>Using Push.js to Display Web Browser Notifications</title>
        <link rel="stylesheet" href="/styles.css">
    </head>
    <body>
        <h1>Using Push.js to Display Web Browser Notifications</h1>
        <p>This is a demo showcasing the use of web notifications using the open-source <a href="https://github.com/Nickersoft/push.js" target="_blank">Push.js</a> library.</p>
        <button class="request-btn">Request permissions</button>
        <button class="show-btn">Show notification</button>
    </body>
    <script src="https://cdnjs.cloudflare.com/ajax/libs/push.js/1.0.5/push.js"></script>
    <script src="/javascript.js"></script>
</html>
Finally, for your icon.png we used the following image, but you're free to use anything you'd like!
![]() The Sabe.io notification icon!
The Sabe.io notification icon!
If all goes well, after you save all the files and again serve it up using a web server, your app should function exactly the same as our demo here.
Thanks for reading and have fun sending notifications! 🔔🔔🔔
Another look at the demo!
Further Reading
 How to Install Node on Windows, macOS and Linux
 Create an RSS Reader in Node
 Getting Started with Electron
 How to Serve Static Files with Nginx and Docker
 How to deploy a PHP app using Docker
 Getting Started with Sass
 How to Scrape the Web using Node.js and Puppeteer
 Creating a Twitter bot with Node.js
 Building a Real-Time Note-Taking App with Vue and Firebase
 Getting Started with React
 Getting Started with Vuex: Managing State in Vue
 How To Create a Modal Popup Box with CSS and JavaScript