
In this tutorial, we will be using Axios to pull data from a REST API. Axios is an awesome HTTP client library which lets you asynchronously issue HTTP requests to interact with REST endpoints. Under the hood, Axios performs AJAX calls by exposing a simple and clear API for us to use instead of having to deal directly with XMLHttpRequest.
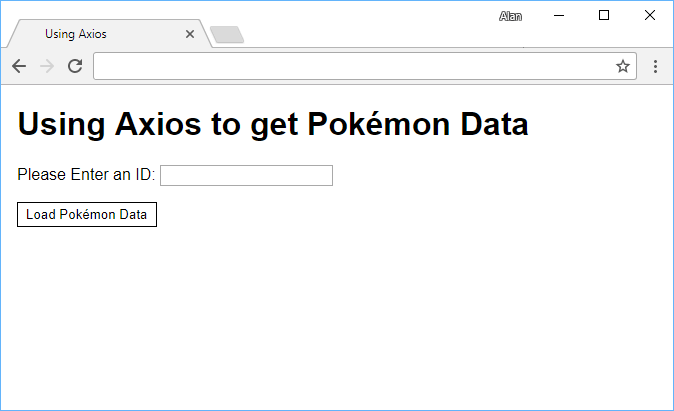
This is what the finished product will look like before we start:
 The finished product.
Take a look at the live demo of the finished product before continuing on with this tutorial!
Setup
While you can do quite a bit using Axios, we will only be using GET requests and then displaying the data that we received from the API. To keep things simple, we will load Axios using a CDN.
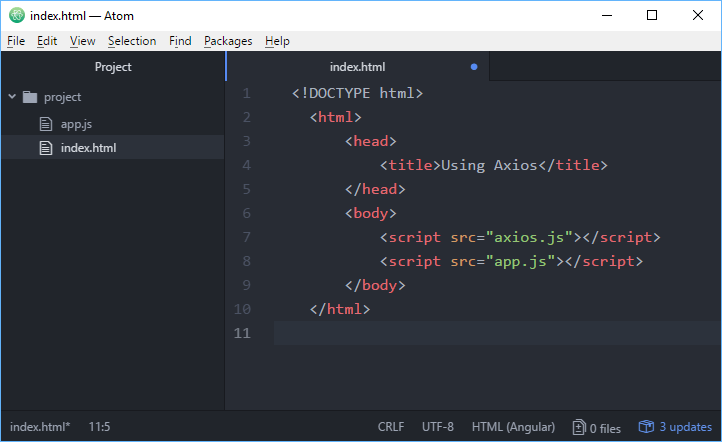
Therefore, our index.html can look something like this:
HTML<!DOCTYPE html>
<html>
    <head>
        <title>Using Axios</title>
    </head>
    <body>
        <script src="https://cdnjs.cloudflare.com/ajax/libs/axios/0.17.0/axios.js"></script>
        <script src="app.js"></script>
    </body>
</html>
The first script tag loads Axios and the second tags loads our own JavaScript file, named app.js. With this in place, we are ready to start using Axios.
Your project structure should look like this:
 Your project's folder structure.
Our API
The API we will be using is the Pokéapi to display a Pokémon's name and image that corresponds to an ID that you provide. This is a simple way to show how we can interact with an API using data that we can control.
Put this inside your app.js:
JAVASCRIPTconst apiUrl = "https://pokeapi.co/api/v2/pokemon/";
const input = document.querySelector(".pokemon-input");
const pokemonName = document.querySelector(".pokemon-name");
const pokemonImage = document.querySelector(".pokemon-image");

function getPokemonData() {
    axios.get(apiUrl + input.value)
    .then(function (response) {
        pokemonName.innerHTML = response.data.forms[0].name;
        pokemonImage.src = response.data.sprites.front_default;
    })
    .catch(function (error) {
        pokemonName.innerHTML = "(An error has occurred.)";
        pokemonImage.src = "";
    });
}

const button = document.querySelector(".pokemon-button");
button.addEventListener("click", getPokemonData);
Let's break it down.
JAVASCRIPTfunction getPokemonData() {
    axios.get(apiUrl + input.value)
    .then(function (response) {
        pokemonName.innerHTML = response.data.forms[0].name;
        pokemonImage.src = response.data.sprites.front_default;
    })
    .catch(function (error) {
        pokemonName.innerHTML = "(An error has occurred.)";
        pokemonImage.src = "";
    });
}
This is the main portion of this app. Upon calling getPokemonData(), we are immediately using Axios to send a GET request to the API url (defined at the top) with the Pokémon's ID.
For example, if the ID we wanted was 25, the full URL would be: https://pokeapi.co/api/v2/pokemon/25
Making it Work
Now that our JavaScript code is finalized, let's go adjust our index.html to look like this:
HTML<!DOCTYPE html>
<html>
    <head>
        <title>Using Axios</title>
    </head>
    <body>
        <h1>Using Axios to get Pokémon Data</h1>
        <div>
            Please Enter an ID:
            <input type="number" min="1" value="1" class="pokemon-input"></input>
        </div>
        <div>
            <span class="pokemon-name"></span>
        </div>
        <img class="pokemon-image"></img>
        <button class="pokemon-button">Load Pokémon Data</button>
        <script src="https://cdnjs.cloudflare.com/ajax/libs/axios/0.17.0/axios.js"></script>
        <script src="app.js"></script>
    </body>
</html>
We have an input field to select the Pokémon ID you'd like to fetch, the text that will be replaced once the request is successful, the image that will be replaced by its sprite, then the button that issues the request.
Conclusion
With your index.html and app.js finalized, we can now test this app. Because we are making AJAX calls with Axios, this may not work locally. You might either need to upload your files to a remote web server or set up a local web server using Node.js.
To make this app look a little pretty, you can optionally apply these styles below:
CSSbody {
    width: 40rem;
    margin: auto;
    font-family: sans-serif;
}
div {
    margin-bottom: 1rem;
}
.pokemon-name {
    text-transform: capitalize;
    font-weight: bold;
}
img {
    display: block;
}
button {
    background-color: white;
    border-style: none;
    border: solid 1px black;
    padding: 0.25rem 0.5rem;
    cursor: pointer;
}
Once you have done that, your app should look and function like this:
 The app before the request is issued.
Then, after you select an ID and hit the button, you should get back the name:
The app after the request is issued.
Don't forget, you can check out the live demo of this by clicking here.
This is just a very basic example of using Axios. You can do a whole lot more with the library including issuing other types of requests like POST and PUT, canceling requests, and automatic JSON parsing. You can even use Axios server-side with Node.js.
I hope this tutorial helped you, and thanks for reading!
Resources

 Getting Started with Solid
 How to Serve Static Files with Nginx and Docker
 How to deploy a PHP app using Docker
 How to deploy a Node app using Docker
 Getting Started with Sass
 Learn how to use v-model with a custom Vue component
 Using Puppeteer and Jest for End-to-End Testing
 How to Scrape the Web using Node.js and Puppeteer
 Getting Started with Moment.js
 Learn how to build a Slack Bot using Node.js
 Creating a Twitter bot with Node.js
 Setting Up Stylus CSS Preprocessor