
The front-end development scene changes at a lightning pace. You don’t go too long without hearing about a new and upcoming JavaScript library that promises it is going to change everything. A few of them actually live up to their hype, like Google’s Angular and Facebook’s React. Others, not so much.
 Monkey User cartoon from monkeyuser.com.
The end result is a landscape that makes it very confusing for beginners to know where to begin. If you’re trying to get into front-end development nowadays, it can seem like everything is a buzzword and nothing makes any actual sense.
Babel, Webpack, React, Grunt, Angular, Meteor, Ember, ES6, Redux, JSX, npm, Typescript, and the list goes on and on.
I’m writing this post to help people get started with very little knowledge required other than basic HTML, CSS and JavaScript.
If you can build a static page that when you click a button it changes the background color, you’re ready to keep reading!
What’s this Vue thing?
Before you dive into some code, I think a quick introduction and a bit of context would be useful here. Vue is a JavaScript library for building user interfaces, with an extremely simple yet powerful API, small library size, and great performance.
This makes Vue a perfect choice for what this tutorial is trying to accomplish, which is getting you started with a concrete example.
What am I going to build?
You’re going to build a simple app that renders a list of post titles which are filterable with a search box, with the option of being able to click on a title to read the entire body of the post.
The core functionality is simple, but to build this will require making HTTP requests for data, handling routing between different views, utilizing different templates, binding event listeners, and taking advantage of computed values.
Fear not, if you stick through this entire tutorial, everything will make sense in the end.
Let’s get started
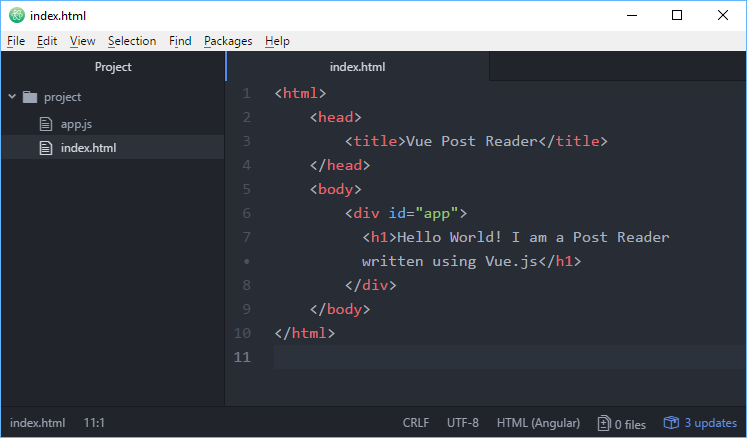
Create a folder that will serve as the root directory for your project and name it whatever you’d like. Start off with a basic HTML file, say, index.html.
HTML<html>
    <head>
        <title>Vue Post Reader</title>
    </head>
    <body>
        <div id="app">
            <h1>Hello World! I am a Post Reader written using Vue.js</h1>
        </div>
    </body>
</html>
None of this should look unfamiliar to you as this is just basic HTML.
But now let’s throw in some Vue goodness in there so the real fun can begin. Create a file called app.js, which is where we will put all of our Vue code. After you’ve done that, proceed to add the script tags to utilize Vue and app.js, like so:
HTML<html>
    <head>
        <title>Vue Post Reader</title>
    </head>
    <body>
        <div id="app">
            <h1>Hello World! I am a Post Reader written using Vue.js</h1>
        </div>
        <script src="https://cdnjs.cloudflare.com/ajax/libs/vue/2.6.14/vue.min.js"></script>
        <script src="app.js"></script>
    </body>
</html>
Your project folder should look like this:
 Your project's folder structure.
Diving into Vue
Now that you’re all setup and ready to use Vue, open app.js and add this.
JAVASCRIPT// static posts Vue component
Vue.component("static-posts", {

    // setting the template that this component will use to render
    template: "#static-posts-template",

    // the data function is where we define all the variables this component will need
    // in this specific case, we only need to worry about an array of posts
    data: () => ({
        posts: []
    }),

    // this is called whenever this component is mounted onto the DOM
    // basically whenever we want to show all the posts, we go and get them
    mounted() {
        this.getPosts();
    },

    // this is where you define all the methods this component needs
    methods: {

        // getPost simply sets the 'posts' variable with static data
        getPosts() {
            this.posts = [
                {
                    "title": "The first post title!"
                },
                {
                    "title": "The second post title!"
                },
                {
                    "title": "The third post title!"
                }
            ];
        }
    }
});

// Create new Vue instance and mount onto element with id app
new Vue({
    el: '#app'
});
The first line of code is how you define a Vue component, in this case called static-posts:
JAVASCRIPTVue.component("static-posts", {
Recall that, ultimately, these components need to eventually output HTML, and so you need to provide this component a structure for it, or, a template where it can build that HTML markup from. You do that by setting the template property:
JAVASCRIPTtemplate: "#static-posts-template"
This references the template with id static-posts-template in your markup. Now all you need is the raw data to turn your template into actual HTML.
Components are capable of managing their own data internally, but you need to first define what variables will be managed, and you do so inside the data function.
Because we are only rendering a static list of posts for now, a simple array called posts is enough:
JAVASCRIPTdata: () => ({
    posts: []
})
You can accomplish this by requesting the data to be populated when the component is mounted, essentially when it is initially put into view.
JAVASCRIPTmounted() {
    this.getPosts();
}
That alone still won’t populate the posts array, but this is good practice for readability purposes instead of shoving just the logic inside mounted().
You can define the getPosts() function inside Vue’s methods object. This is where you define all of the methods your component needs, but in your case, you only need one and that is getPosts().
Mounting your first Component
There really isn’t that much more left on the JavaScript side to get this app to render properly. Now you just need to actually create a Vue instance, and mount it. You accomplish this with the last 3 lines:
JAVASCRIPTnew Vue({
    el: "#app"
});
If you recall from your markup, we had a div tag with an id of app. That is where Vue is mounting itself to.
Shifting gears now, head back to your markup. Remove the h1 message, and replace it with your newly-created component. The entire div element should now look like this:
HTML<div id="app">
    <static-posts />
</div>
That tag tells Vue where you want to render your static-posts component. In this case, it is the only custom component that it will render, which is what you want for now anyways.
Making your first Template
The very last piece of the puzzle missing is the actual template that Vue needs to render the component. With a bare-bones template, your full markup might look something like this:
HTML<html>
    <head>
        <title>Vue Post Reader</title>
    </head>
    <body>
        <div id="app">
            <static-posts />
        </div>
        <template id="static-posts-template">
            <div>
                <h1>Here are the post titles:</h1>
                <ul>
                    <li v-for="post in posts">
                        {{post.title}}
                    </li>
                </ul>
            </div>
        </template>
        <script src="https://cdnjs.cloudflare.com/ajax/libs/vue/2.6.14/vue.min.js"></script>
        <script src="app.js"></script>
    </body>
</html>
To make a template, you start off with a template tag, give it an id that matches the one from your component, and dive right in. Everything inside should be completely familiar except:
HTML<li v-for="post in posts">
    {{post.title}}
</li>
What is this?
Recall that the variable that holds our posts was called posts. v-for is, as one might guess, a for-loop. Vue is going through each element in the posts array, and then assigning it to the variable called post for use anywhere inside that tag. We only use it once though, inside the li tags.
Since post represents a single post, you can just use basic JavaScript syntax to access the title value for that post. To prevent it from rendering as just plain text, wrap it inside double brackets. This is called interpolation and it is what prevents that line of markup to render as post.title when you instead want the actual post’s title to render.
And that’s it
You should now see the static data display inside an unordered list, right before your eyes. If all went well, you should see something similar to this:
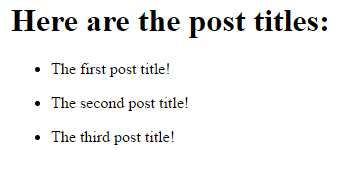 This is what you should be seeing.
Now you can move on to a more interesting app because, let’s be honest, you didn’t come this far to display static data. You want to display live data, and who can blame you?
To get your live data, you’ll be using typicode’s placeholder JSON API service.
Since Vue is just focused on user interfaces, it doesn’t have a native way to make requests for data (something you will hopefully appreciate and realize is actually a good thing).
Not only does this allow you to decide for yourself what library you want to use to handle data requests (because there are many great ones available), but it also helps keep Vue small and focused.
Data Requests and Routing
With that being said, you will be using Axios for requests. You don’t necessarily need to know much about it, just know that instead of using raw XMLHttpRequests, Axios offers a much nicer API to work with.
With data requests in good hands, you can now move on to routing.
Routing is what handles navigating through the app as you would a normal website. For example, going from the homepage to the about page, or the about page to the contact page. You can consider each page to be a different route.
Vue needs to know what you would like displayed at these routes. In other words, it needs a router. While Vue doesn’t natively support full-blown routing on its own (for the same reasons it doesn’t natively support requests), you can, however, use the official router for Vue, vue-router.
Written by the same people behind Vue itself, it is just what you need to build a nice and simple single-page app.
Kick it up a notch
In this iteration of our code, you will incorporate Axios to get live data, and our router so that the app has routing. Open your app.js and replace the entire thing with this:
JAVASCRIPT// base Url of the API
const baseUrl = "https://jsonplaceholder.typicode.com";

// List component
const List = {
    template: "#list-template",
    data: () => ({
        posts: []
    }),
    mounted() {
        this.getPosts();
    },
    methods: {
        getPosts() {
            axios.get(baseUrl + `/posts`).then(response => {
                this.posts = response.data;
                console.log(this.posts);
            }).catch(error => {
                console.log(error);
            })
        }
    }
};

// Post component
const Post = {
    template: "#post-template",
    data: () => ({
        post: null
    }),
    mounted() {
        this.getPosts();
    },
    methods: {
        getPosts() {
            const id = this.$route.params.id;
            axios.get(baseUrl + `/posts/` + id).then(response => {
                this.post = response.data
                console.log(this.post);
            }).catch(error => {
                console.log(error);
            })
        }
    }
};

// Create vue router
const router = new VueRouter({
    mode: "history",
    routes: [
        {
            name: "homepage",
            path: "/",
            component: List
        }, {
            name: "post",
            path: "/:id",
            component: Post
        }
    ]
});

// Create vue instance with our router, and mount onto #app
const vue = new Vue({router});
const app = vue.$mount("#app");
I decided to be a little light on the comments this time around because, despite the size, there actually isn’t too many things that should be unfamiliar to you at this point.
Let’s break it down.
The very beginning should be straightforward, it’s just a variable that is holding where we are getting our data from, nothing too crazy there.
The only thing that really changes is the body of getPosts(). Instead of static data like before, you’re making a request for that data:
JAVASCRIPTgetPosts() {
    axios.get(baseUrl + `/posts`).then(response => {
        this.posts = response.data
        console.log(this.posts);
    }).catch(error => {
        console.log(error);
    })
}
You are issuing a GET request to the /posts route on the base URL that we defined at the top of the file. If successful, you assign posts the data that was returned in the response. Otherwise, the error is logged to the console.
Why have two separate components?
You have two components, Post and List because the List component represents multiple posts, while the Post component represents just a single post.
For a single post, you need to provide the post id, which you get from the route itself. In other words, when you access http://127.0.0.1:8080/6, you want the post with id 6, and so you get the number 6 from the route, and append it to the URL that you make the GET request to.
That is what this piece of code is doing:
JAVASCRIPTconst id = this.$route.params.id;
axios.get(baseUrl + `/posts/` + id).then(response => {
And this router stuff at the bottom?
JAVASCRIPT// Create vue router
const router = new VueRouter({
    mode: "history",
    routes: [
        {
            name: "homepage",
            path: "/",
            component: List
        }, {
            name: "post",
            path: "/:id",
            component: Post
        }
    ]
});
Setting the mode to history prevents your URLs from having a # sign at the end, and instead look like “normal” URLs.
Next up is the routes that you want. In this case, you only care about a homepage, which is going to display all the post titles, then an individual post route, that will display the singular post. Thus, you have two routes in the array.
Each route needs a name, a path, and a component to render. To declare that a route contains a variable, you prepend it with a colon, which is what I did here:
JAVASCRIPTpath: "/:id",
With this router in place, the / route, or homepage, will render your list of post titles. The /:id route will display render an individual post whose id matches the one given.
Now mount the new and improved app
JAVASCRIPT// Create vue instance with our router, and mount onto #app
const vue = new Vue({router});
const app = vue.$mount("#app");
Create a Vue instance like before, but this time pass in the router that we defined so that Vue can use it. Once that’s done, mount the app onto the element with id app.
Now back to index.html. You’ll need two templates this time, one for each new component.
Template #1
HTML<template id="list-template">
    <ul>
        <li v-for="post in posts">
            <router-link :to="{ name: 'post', params: { id: post.id }}">
                {{post.title}}
            </router-link>
        </li>
    </ul>
</template>
As with before, there shouldn’t really be much that is new to you. You’re looping through all the posts and doing something with each post. In this case, we are outputting the title, wrapped in something called a router-link.
router-link is how vue-router keeps track of navigation. Instead of a URL like you’re used to inside an a tag, you need to tell Vue what route you are trying to access, and then any parameters to you want to pass.
Since you are clicking on a post’s title, you want to go to the post route. However, recall that you need to pass in the post’s id so that Vue knows where to fetch that post’s data. That is what this is doing:
JAVASCRIPTparams: { id: post.id}
You’re basically passing in the post’s id, as the value of the id parameter. Vue will then render the Post component using that id, and you’ll see the post you were trying to retrieve.
Template #2
The second template is much simpler:
HTML<template id="post-template">
    <div>
        <router-link :to="{ name: 'homepage' }">Homepage</router-link>
        <h3>{{post.title}}</h3>
        {{post.body}}
    </div>
</template>
You don’t need to iterate over anything this time because there is no array, just a single post inside the post variable. There’s also a router-link to help you navigate back to the homepage. Since this route doesn’t require any parameters, you can just omit that part entirely.
When you put it all together, your markup should look like this:
HTML<html>
    <head>
        <title>Vue Post Reader</title>
    </head>
    <body>
        <div id="app">
            <router-view />
        </div>
        <template id="list-template">
            <ul>
                <li v-for="post in posts">
                    <router-link :to="{ name: 'post', params: { id: post.id }}">
                        {{post.title}}
                    </router-link>
                </li>
            </ul>
        </template>
        <template id="post-template">
            <div>
                <router-link :to="{ name: 'homepage' }">Homepage</router-link>
                <h3>{{post.title}}</h3>
                {{post.body}}
            </div>
        </template>
        <script src="https://cdnjs.cloudflare.com/ajax/libs/vue/2.6.14/vue.min.js"></script>
        <script src="https://cdnjs.cloudflare.com/ajax/libs/vue-router/2.5.3/vue-router.js"></script>
        <script src="https://cdnjs.cloudflare.com/ajax/libs/axios/0.16.1/axios.js"></script>
        <script src="app.js"></script>
    </body>
</html>
That router-view tag inside #app is where the router’s component will render. If you wanted to create a header or footer for the app that is consistent across different views, you can simply put it before or after that tag.
And that’s it! Save both files, and refresh
If all goes well, you should be able to click on a post’s title to get the body in a new view, then click on Homepage to head back. The homepage should look like this:
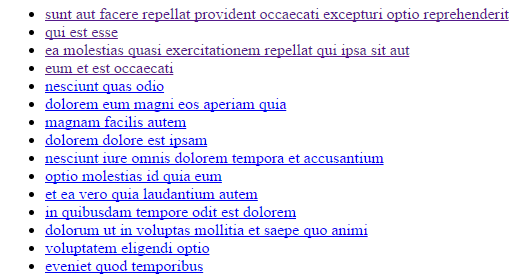 The list of posts on the homepage.
If you don't see that, and instead get an error, it might be because you cannot do AJAX calls locally. To solve this problem, you will need to upload your files to a remote web server or serve up the files locally by running a local web server. Once you do either, you should be able to see the app in action.
Using Computed Properties
I hope you’re already realizing the power of Vue, but there’s no reason to stop here. There’s one last simple feature that you can quickly add to showcase yet another cool thing you can do with Vue and that is using v-model. v-model allows you to create two-way data bindings on form input and textarea elements.
What does that even mean?
When we use the v-model attribute on an input tag, we are telling Vue to set the initial value of that input tag, to whatever variable we want, but also, that when the user changes the value, we want the new value automatically assigned as the value of that variable.
To demonstrate how powerful this feature is, you’re going to add one last bit of functionality to the app.
You’re going to add a search box that, as you type in letters, will only display the posts whose titles contain the letters you have typed.
Filtering Posts by Search Terms
To implement this feature, start in your index.html where you only need to make minor changes. Replace:
HTML<li v-for="post in posts">
with
HTML<li v-for="post in filteredPosts">
This changes the source of the posts.
Instead of just iterating through all the posts, you only want to display the filtered posts. Easy enough so far.
Now you can use v-model. Add these two lines of markup right above the unordered list:
HTML<input v-model="search" placeholder="Enter search terms">
<p>Displaying {{ filteredPosts.length }} posts, filtered by <strong>{{ search }}</strong></p>
The first line is the text input that the user can type into. That value will set the search variable, and you give it a simple placeholder text so the user knows what to do with the box.
The second line will display the number of posts currently being displayed, and then echo back the search terms inside the box.
Swing back to app.js to finish implementing this.
Since you are now keeping track of a new variable, search, you need to actually add it to the data function. Inside your List component, add the search variable:
JAVASCRIPTdata: () => ({
        posts: [],
        search: ""
    })
Now it’s time to implement filteredPosts.
To accomplish this, you will take advantage of computed properties. As the name implies, it is a property that can change over time for properties that cannot simply be calculated a single time. As you search, the filtered posts will change, and thus, you cannot utilize a static variable for this.
Here is the filteredPosts implementation:
JAVASCRIPTcomputed: {
        filteredPosts() {
          return this.posts.filter(post => {
             return post.title.includes(this.search);
          })
        }
    }
To filter your posts, I am using JavaScript’s built-in filter method on arrays to do the trick. You need to tell JavaScript whether or a not a post makes the cut, and you do this by checking if the post’s title contains your search terms.
If it does, the expression evaluates to true, and JavaScript appends this post to the array that it will ultimately return. If the check fails, then the post doesn’t make the cut, and you don’t see it displayed.
At the end of it all, filteredPosts will now return a new array with the posts that are filtered by the search terms in the textbox.
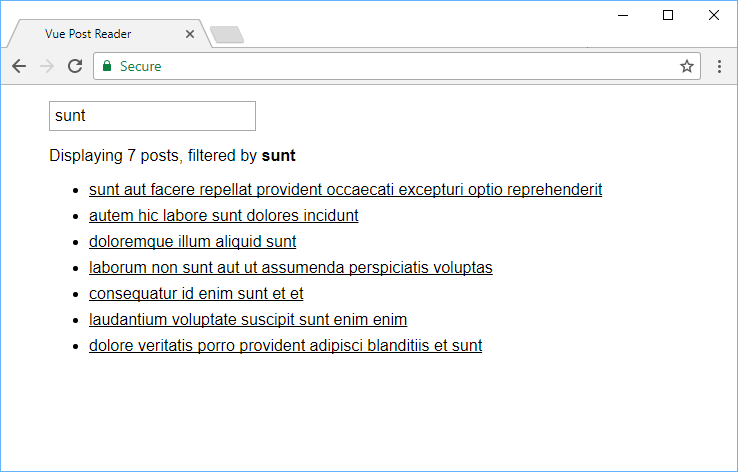
You should now be able to type into the box any string you’d like, and see the posts change right before your eyes! This is what you should see:
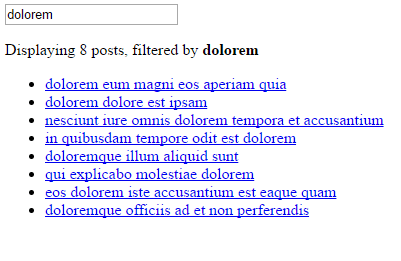 Searchable posts via the search field.
In case you are having any difficulties piecing it all together, below are the final index.html and app.js for the app.
HTML<html>
    <head>
        <title>Vue Post Reader</title>
    </head>
    <body>
        <div id="app">
            <router-view />
        </div>
        <template id="list-template">
            <div>
                <input v-model="search" placeholder="Enter search terms">
                <p>Displaying {{ filteredPosts.length }} posts, filtered by <strong>{{ search }}</strong></p>
                <ul>
                    <li v-for="post in filteredPosts">
                        <router-link :to="{ name: 'post', params: { id: post.id }}">
                            {{post.title}}
                        </router-link>
                    </li>
                </ul>
            </div>
        </template>
        <template id="post-template">
            <div>
                <router-link :to="{ name: 'homepage' }">Homepage</router-link>
                <h3>{{post && post.title}}</h3>
                <p>{{post && post.body}}</p>
            </div>
        </template>
        <script src="https://cdnjs.cloudflare.com/ajax/libs/vue/2.6.14/vue.min.js"></script>
        <script src="https://cdnjs.cloudflare.com/ajax/libs/vue-router/2.5.3/vue-router.js"></script>
        <script src="https://cdnjs.cloudflare.com/ajax/libs/axios/0.16.1/axios.js"></script>
        <script src="app.js"></script>
    </body>
</html>
JAVASCRIPT// Base Url of the API
const baseUrl = "https://jsonplaceholder.typicode.com";

// List component
const List = {
    template: '#list-template',
    data: () => ({
        posts: [],
        search: ""
    }),
    mounted() {
        this.getPosts();
    },
    methods: {
        getPosts() {
            axios.get(baseUrl + `/posts`).then(response => {
                this.posts = response.data
                console.log(this.posts);
            }).catch(error => {
                console.log(error);
            })
        }
    },
    computed: {
        filteredPosts() {
          return this.posts.filter(post => {
             return post.title.includes(this.search);
          })
        }
    }
};

// Post component
const Post = {
    template: '#post-template',
    data: () => ({
        post: null
    }),
    mounted() {
        this.getPosts();
    },
    methods: {
        getPosts() {
            const id = this.$route.params.id;
            axios.get(baseUrl + `/posts/` + id).then(response => {
                this.post = response.data
                console.log(this.post);
            }).catch(error => {
                console.log(error);
            })
        }
    }
};

// Create vue router
const router = new VueRouter({
    mode: "history",
    routes: [
        {
            name: "homepage",
            path: "/",
            component: List
        }, {
            name: "post",
            path: "/:id",
            component: Post
        }
    ]
});

// Create vue instance and mount onto #app
const vue = new Vue({router});
const app = vue.$mount("#app");
If you apply the below styles, it will make the app look a lot better.
CSSbody {
    width: 40rem;
    margin: 1rem auto;
    font-family: sans-serif;
}
a {
    color: black;
}
li {
    margin-bottom: 0.5rem;
}
input {
    padding: 0.25rem;
    font-size: 1rem;
}
This makes our Vue app look like this:
 This is the styled app.
In addition, you can view a live demo of this app before continuing with this tutorial.
The Takeaway
Modern front-end development is still pretty chaotic, but it doesn’t mean you have to lose your mind. If you're looking for a great place to start, you really don’t need to look any further than Vue.
The library is only getting more popular as it positions itself as a cleaner, faster, and more straight-forward alternative to bigger players like Angular and React, that, in my opinion, absolutely deserves to be on any front-end developer’s radar.
I hope that this post has helped you establish a starting point for you and provided to you a concrete example to work with. If you take this base and build something even cooler on top of it, I would love to see it.
Also, if you got stuck on any part of this, or need any further clarification, please do not hesitate to tweet at us! Good luck building cool things with Vue!
 Good luck with Vue!
Resources

 Getting Started with TypeScript
 Getting Started with Express
 Git Tutorial: Learn how to use Version Control
 How to Serve Static Files with Nginx and Docker
 How to Set Up Cron Jobs in Linux
 How to build a Discord bot using TypeScript
 How to deploy a Deno app using Docker
 Getting Started with Handlebars.js
 Building a Real-Time Note-Taking App with Vue and Firebase
 Setting Up Stylus CSS Preprocessor
 Using Axios to Pull Data from a REST API
 How To Create a Modal Popup Box with CSS and JavaScript