
Breaking down larger pieces of an app into smaller components has become really popular thanks to the rise of front-end libraries like React and Vue. Components allow you to easily reuse code, reduce architectural complexity, and build impressive user interfaces by logically dividing your code into independent chunks.
However, despite these advantages, one issue that eventually hits any application that grows large enough is the difficulty of managing its state. Facebook's answer to this challenge was Flux, a pattern that later served as the basis for the more popular Redux state management library that is commonly used with React.
The Vue team, realizing that their library would also need a way to manage state, introduced Vuex, the official state management library for Vue.
In this tutorial, we will be diving into Vuex by building a nice todo app. Make sure that you are comfortable with both JavaScript and Vue before continuing with this tutorial. This is what we will be building:
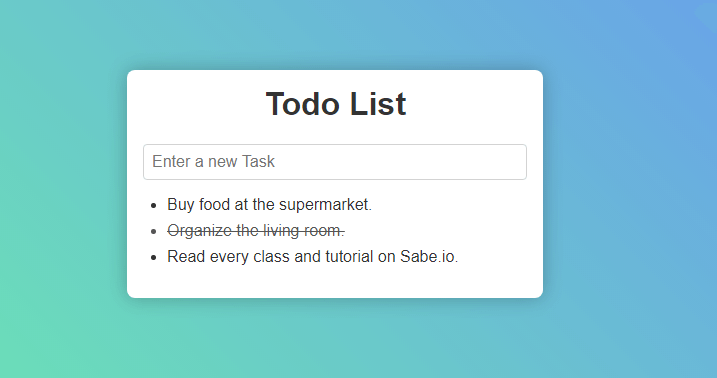 The todo list app we'll be building.
You can check out a live demo of the finished app here.
State Management
As mentioned before, state management becomes tricky when your app becomes larger and more complex. You can get away without standalone state management if your app is small, but as it grows, your code could easily become a nightmare to debug and iterate upon.
The state of an application is a collection of variables and their values at that point in time (basically the data powering your app). For example, if you open a calculator app for the first time, its current total would be 0 so its state could look like this:
JAVASCRIPT{
    total: 0
}
After you evaluate 2 + 4, its state could look like this:
JAVASCRIPT{
    total: 6
}
This is where Vuex comes into play. It offers you a clear and organized way to initialize, manage, and modify your Vue application's state in a straightforward and easy-to-track way.
Setting up Vue and Vuex
Create a folder to serve as the root directory for this app, and create three files in that folder, index.html to contain our markup, styles.css for our styles, and app.js for our code.
Put this inside your index.html:
HTML<html>
    <head>
        <title>Todo List</title>
        <link rel="stylesheet" href="styles.css">
    </head>
    <body>
        <div class="container">
            <h1>Todo List</h1>
            <div id="app"></div>
        </div>
        <script src="https://cdnjs.cloudflare.com/ajax/libs/vue/2.6.14/vue.min.js"></script>
        <script src="https://unpkg.com/[email protected]/dist/vuex.min.js"></script>
        <script src="app.js"></script>
    </body>
</html>
This pulls in our styles from styles.css and imports the following three JavaScript files:
- Vue from the Unpkg CDN
- Vuex from the Unpkg CDN
- Our app.js script in our folder
At this point, your project folder should look like this:
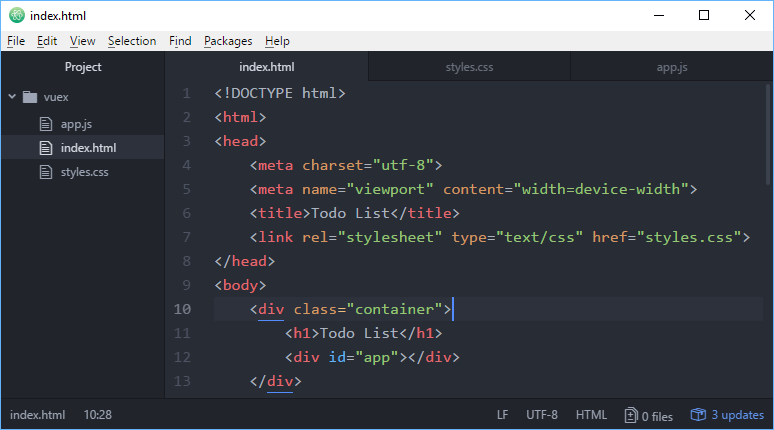 Your project folder.
Vuex Overview
The whole idea behind Vuex is confusing at first but becomes clear with time. A simple overview of Vuex and its most important concepts are critical to be familiar with as it will make building this app (and future ones) much easier.
In Vuex, you have something called the store. The store is a global object that contains four major things that Vuex needs to manage state in our Vue app. We'll go over each four below.
The first thing our store needs is the state. This is Vuex's bread and butter. The state is the JavaScript object that contains the actual data that your app needs to function.
We can retrieve data from the store by defining the getters of the store and then calling them when we need to. The getters are just functions that get the data from the state for you.
Now that we can get data from the state, we need a way to change or modify it. For example, when a new calculation is evaluated on a calculator, you'd want the total to be updated. This changing of the state is called mutating it. Thus, changes to the state are also called mutations.
One final thing to keep in mind is that even though mutations are what actually modify the state, the functions should not be called directly. Mutations to the state should only be called by separate functions called actions.
The idea here is that while you technically can just directly mutate the state to your liking, action functions that themselves call mutations ensure we can modify our state in a predictable, safe, and clean way.
So, to recap, here are the four major concepts of a Vuex store:
- State: The object that holds your app's data.
- Getters: Functions that return back data contained in the state.
- Mutations: Functions that directly mutate the state, as the state is an immutable object.
- Actions: Functions that call mutations on the state. They can call multiple mutations, can call other actions, and they support asynchronous operations.
Here is a diagram of Vuex which should hopefully make more clear what is going on:
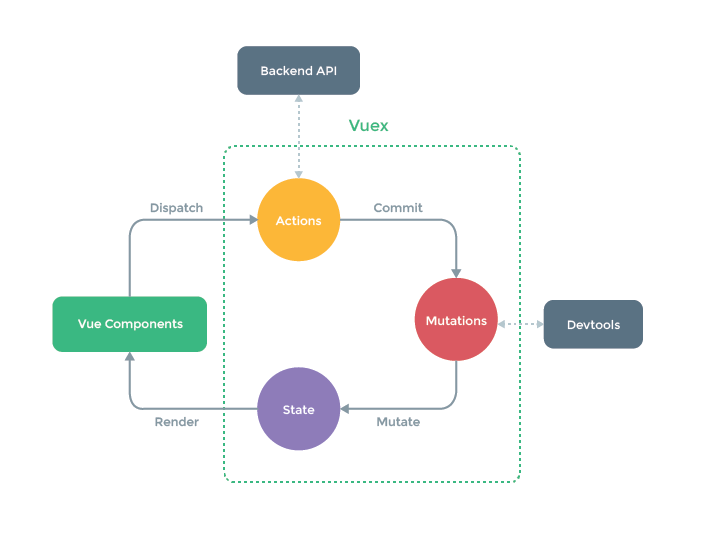 A diagram of Vuex from the official project Github page.
Users will interact with the Vue components on their screen. Some of these interactions will trigger action functions that then commit mutations on the state. After the state has been mutated, Vue uses this new state to re-render the affected components on the screen.
Now, let's get to some implementing!
Vuex State
The first step in using Vuex is simply deciding on what pieces of data your app will need to function properly, the state. Recall that we are building a todo list app. With that in mind, it is logical to conclude that in our simple example we will only need a single thing to hold in our state, the array of todo items.
Each todo item should contain a string that describes the task and then a boolean to keep track of whether or not the item was completed. Also, to keep track of our items, we'll give them each a unique ID number.
Here is the state of our Vue app, initialized with three example todo items.
JAVASCRIPTconst state = {
    todos: [
        {
            id: 0,
            task: "Buy food at the supermarket.",
            completed: false
        },
        {
            id: 1,
            task: "Organize the living room.",
            completed: true
        },
        {
            id: 2,
            task: "Read every class and tutorial on Sabe.io.",
            completed: false
        }
    ]
};
Vuex Getters
Luckily for us, in this example, our state only contains a single thing, the array of our todo items. Because of this simplicity, we only need a single getter function that retrieves the entire array.
JAVASCRIPTconst getters = {
    getTodos: state => state.todos
};
Onwards to mutations!
Vuex Mutations
Recall that the only job of mutation functions is to mutate, or modify, the state. In our example, there are three things we would ever need to do to our state:
- Add a new item: When we want a new todo item, we should be able to add it to the array.
- Toggle the completion: We should be able to go back and forth between the two completion states of a task.
- Delete an item: When we no longer want a todo item, we should be able to remove it from the array.
Keeping this in mind, here are our three mutations:
JAVASCRIPTconst mutations = {
    ADD_TODO: (state, payload) => {

        const newTask = {
            id: payload.newId,
            task: payload.task,
            completed: false
        }

        state.todos.unshift(newTask);
    },
    TOGGLE_TODO: (state, payload) => {
        const item = state.todos.find(todo => todo.id === payload);
        item.completed = !item.completed;
    },
    DELETE_TODO: (state, payload) => {
        const index = state.todos.findIndex(todo => todo.id === payload);
        state.todos.splice(index, 1);
    }
};
Mutation functions, in addition to getting access to the state, also get access to a payload, which is just the information needed to make the mutation. In the case of ADD_TODO the payload is all the information needed to create a brand new todo item, and in the case of TOGGLE_TODO and DELETE_TODO, we only care about the ID of the todo item, so we only passed that in.
Ultimately in all three mutation functions, we are just doing basic array manipulation:
- In
ADD_TODO, we are simply creating a brand new item and adding it to the array viaunshift. - In
TOGGLE_TODO, we are finding the todo item in the array via its unique ID, then inverting itscompletedboolean. - In
DELETE_TODO, we are finding the todo item in the array and then removing it viasplice.
Vuex Actions
The final piece of the puzzle is our action functions. Again, recall that these functions exist to call mutator functions. They're going to be straightforward in this case, but in more complex apps, they are used to perform asynchronous actions and evaluate some logic before making the actual mutations on the state.
Because we don't need to do much here, our action functions are going to be extremely simple.
JAVASCRIPTconst actions = {
    addTodo: (context, payload) => {
        context.commit("ADD_TODO", payload)
    },
    toggleTodo: (context, payload) => {
        context.commit("TOGGLE_TODO", payload)
    },
    deleteTodo: (context, payload) => {
        context.commit("DELETE_TODO", payload)
    }
}
The first parameter of the commit function is the name of the mutation, then the second parameter is the payload needed to make that mutation. In our case, we just pass along the payload given to our action functions.
Vuex Store
At last, we have all four pieces and can finally put it all together to have a working Vuex store for our app. Now all we need to do is define a new store and pass everything we just defined in:
JAVASCRIPTconst store = new Vuex.Store({
    state: state,
    getters: getters,
    mutations: mutations,
    actions: actions
});
We are now completely ready to start incorporating the use of our store inside our Vue app, so let's start on that!
Building our Vue Components
Believe it or not but with our store fully defined and ready to go, we have already built the majority of this app. The rest from this point on is just building the user interface for it.
Ideally for our app we are going to want two components, the component that contains the list of todo items, and then the overall component that contains the entire app, including the form that you use to create new todo items.
Todo Items List Component
We'll start with the todo items list component:
JAVASCRIPTVue.component("todo-list", {
    computed: {
        todos() {
            return this.$store.getters.getTodos;
        }
    },
    methods: {
        toggleTodo: function(id) {
            this.$store.dispatch("toggleTodo", id);
        },
        deleteTodo: function(id) {
            this.$store.dispatch("deleteTodo", id);
        }
    },
    template: "#todo-list"
});
For the list to render properly, it needs the todo items from the store, and so we'll make it accessible via a computed property that returns it from the store. Since the parent is taking care of adding, we only need to support toggling and deleting, and thus we have the two methods toggleTodo and deleteTodo.
If you've noticed, both of these methods just do one thing: dispatches an action. They pass in the ID of the todo item being affected as the payload to be used by the action function (and later the mutator function).
Finally, we set the template to #todo-list so that Vue knows where to get the markup to use for this component.
Todo Parent Container Component
With the list component ready to go, the last part left is defining the Vue app itself that will serve as the glue that holds everything together, and here it is:
JAVASCRIPTconst app = new Vue({
    data: () => ({
        task: "",
        newId: 3
    }),
    methods: {
        addTodo: function() {
            this.$store.dispatch("addTodo", this);
            this.newId ++;
            this.task = "";
        }
    },
    store: store,
    el: "#app",
    template: "#app-template"
});
The data function initializes the task string to being empty so that the user is free to create a brand new task, and newId is set to 3 because we already have three items and want every todo item to have a unique ID. If you initialize the app with more or less todo items, you will have to adjust this variable's initial value.
Under methods, we define the addTodo function which dispatches the addTodo action, passing in this as the payload (which includes the current value for task and the id of the new task item). After the action is dispatched, we increment the newId property so that the next task's ID is ready to go, and reset the value of the task string.
Finally, we pass in the store we defined to Vue, the element we want Vue to mount on, #app, and then the template we want to use, #app-template.
The Markup and Styles
With all the JavaScript in place, it's time to go back and bring our index.html and styles.css files up to speed. Since we defined two new templates for our Vue components, #todo-list and #app-template, we must provide them to Vue.
Add this to your index.html directly above your JavaScript script tags.
HTML<template id="todo-list">
    <ul class="tasks">
        <li v-for="todo in todos"
            :class="{completed: todo.completed}"
            class="task"
            @click="toggleTodo(todo.id)"
            @dblclick="deleteTodo(todo.id)">{{todo.task}}</li>
    </ul>
</template>
<template id="app-template">
    <div>
        <form @submit.prevent="addTodo">
            <input class="todo-input" type="text" placeholder="Enter a new Task" v-model="task" />
        </form>
        <todo-list />
    </div>
</template>
At this point, your app should technically work completely and offer these features:
- Type a new task and press enter to add it to the list.
- Click on a task to toggle its completion status.
- Double-click on a task to remove it completely.
However, we want to make our todo list app look pretty. 😍 Open your styles.css and add this:
CSS[html](https://sabe.io/classes/html) {
    font-family: sans-serif;
    background: linear-gradient(45deg, #6cfd9f, #6887ff);
    height: 100%;
    color: #333;
}

body {
    display: flex;
    height: 100%;
    margin: 0;
}

.container {
    width: 24rem;
    margin: auto;
    background-color: white;
    border-radius: 0.5rem;
    padding: 1rem;
    box-shadow: 0 0 2rem rgba(0, 0, 0, 0.25);
}

h1 {
    text-align: center;
    margin-top: 0;
}

.todo-input {
    width: 100%;
    padding: 0.5rem;
    font-size: 1rem;
    outline: none;
    border-radius: 0.25rem;
    border-style: none;
    border: solid 1px lightgray;
    box-sizing: border-box;
}

.tasks {
    padding-left: 1.5rem;
}

.task {
    margin-bottom: 0.5rem;
}

.task:hover {
    cursor: pointer;
}

.completed {
    text-decoration: line-through;
    color: #555;
}
Conclusion
Your app is now ready to go. Open index.html and see the power of Vuex right before your very eyes.
The todo list app you built.
Again, you can check out a live demo here.
Recall that when you do stuff like add a new todo item, invert its completion boolean, or delete it, here is what is actually happening under the hood:
- You first do something.
- This triggers an action and a payload is passed in.
- Actions then call mutations on the state, and pass in a payload.
- Mutation functions alter the state with that payload.
- Vue automatically re-renders what it needs to re-render given this new state.
I hope that this example app has illustrated just how powerful Vuex can be. On a much bigger application, having standalone state management with Vuex would be crucial for clean code.
If you have any questions or need help, tweet at us @sabe_io! Thanks for reading!
Resources

 How to Install Node on Windows, macOS and Linux
 Getting Started with Svelte
 Create an RSS Reader in Node
 Getting Started with Electron
 How to Serve Static Files with Nginx and Docker
 How to Set Up Cron Jobs in Linux
 Best Visual Studio Code Extensions for 2022
 How to deploy a MySQL Server using Docker
 How to deploy a Node app using Docker
 Getting Started with Sass
 Learn how to use v-model with a custom Vue component
 Build a Real-Time Chat App with Node, Express, and Socket.io