
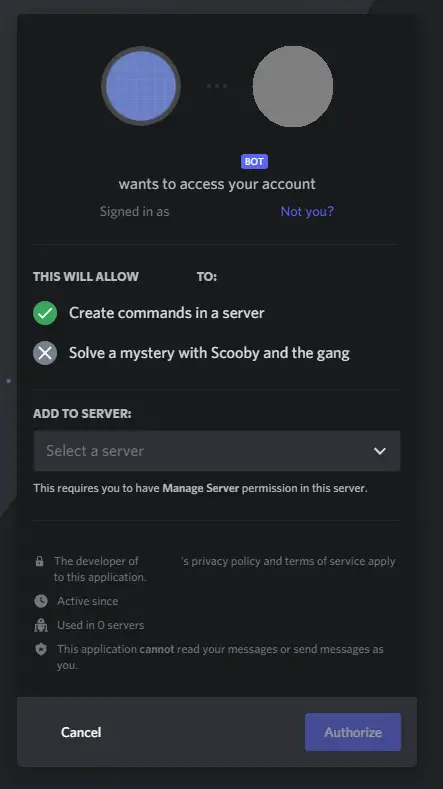
Since its release, Discord has been a huge hit for gamers. It's popularity has continued to grow, and it's now one of the most popular chat platforms in the world. With this increased popularity comes an increased demand for automation. In this tutorial, we will learn how to build a Discord bot using TypeScript and Node. Our bot will use the Discord.js library to connect to Discord, register slash commands, and reply back to the user.
This is what the finished bot will be able to do when we're done:
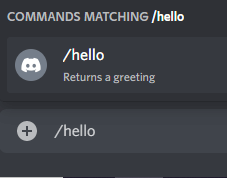 Slash command in chat
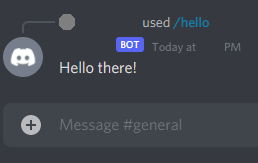 Discord bot reply in chat
Prerequisites
- Basic knowledge of JavaScript.
- Basic knowledge of TypeScript.
- Basic ability to use a command line interface.
- Node and NPM installed. If you don't have them installed, follow our how to install Node guide.
Installing Yarn
We will be using Yarn to manage our dependencies. This step is technically optional because you can just stick to npm if you prefer. To install Yarn, run this:
BASHnpm install -g yarn
To test if you've installed Yarn, check the version:
BASHyarn -v
If you see a version number, you're good to go.
Directory Structure
By the end of this tutorial, our bot will be in the following directory structure:
BASHbot
├── .env
├── dist
├── node_modules
├── src
│   ├── Bot.ts
│   ├── Command.ts
│   ├── Commands.ts
|   ├── listeners
|   |    ├── interactionCreate.ts
|   |    └── ready.ts
|   └── commands
|       └── Hello.ts
├── tsconfig.json
└── package.json
Initialize Project
Run npm init to initialize a new project. Follow the instructions until you have a basic Node project. This should set up a package.json file for you at the end.
After you've done that, let's install discord.js.
BASHyarn add discord.js
Now let's install our dev dependencies.
BASHyarn add -D @types/node ts-node typescript
This will install typings for Node, TypeScript, and ts-node.
Configure TypeScript
To configure TypeScript, we need to create a tsconfig.json file.
Create it in your root directory and add this:
JSON{
    "compilerOptions": {
        "target": "ESNext",
        "module": "commonjs",
        "rootDir": "./src/",
        "outDir": "./dist/",
        "strict": true,
        "moduleResolution": "node",
        "importHelpers": true,
        "experimentalDecorators": true,
        "esModuleInterop": true,
        "skipLibCheck": true,
        "allowSyntheticDefaultImports": true,
        "resolveJsonModule": true,
        "forceConsistentCasingInFileNames": true,
        "removeComments": true,
        "typeRoots": [
            "node_modules/@types"
        ],
        "sourceMap": false,
        "baseUrl": "./"
    },
    "files": [
        "src/Bot.ts"
    ],
    "include": [
        "./**/*.ts"
    ],
    "exclude": [
        "node_modules",
        "dist"
    ],
}
We can't go into each option in this tutorial but the most important ones are rootDir, outDir, and files. This is where we tell the TypeScript compiler where to find our TypeScript files, where we want to put the compiled JavaScript, and what files we want to compile. The rest of the options still do important things, but for the purposes of this tutorial, it is not necessary that you know all of them.
Use Discord.js
Create file inside src called Bot.ts. This file will serve as our entrypoint.
TYPESCRIPTimport { Client } from "discord.js";

console.log("Bot is starting...");

const client = new Client({
    intents: []
});

console.log(client);
For now we'll keep it basic and just log out the client object. This will ensure that we are using the Discord.js library properly. Now we just need to run our bot.
Running the Bot
To run our bot, we need to add the following to our package.json file:
JSON"scripts": {
    "start": "ts-node src/Bot.ts"
}
This command will run our bot when you run yarn start or npm run start. If you do that, you should hopefully see Bot is starting... and then the entire client object printed out.
Discord Bot Token
To actually connect with Discord using discord.js, you'll need a token. You can get one from your Discord Developer Portal dashboard.
 Discord Developer Portal
Once you give your app a name, head on over the Bot tab, then hit Add Bot. After you've given you bot a name, get your Bot's token.
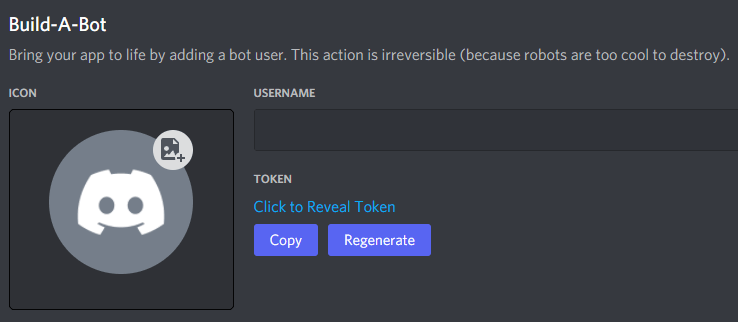 Click to Reveal Token
Save your token somewhere safe, we'll need it later.
Authenticate with Discord
Let's authenticate with Discord using the token we obtained earlier. It is fairly easy to do this with discord.js, simply call the login method on the client object using the token:
TYPESCRIPTimport { Client, ClientOptions } from "discord.js";

const token = ""; // add your token here

console.log("Bot is starting...");

const client = new Client({
    intents: []
});
client.login(token);

console.log(client);
Run the bot again using yarn start or npm run start. If you get the client object printed out, and not Error [TOKEN_INVALID]: An invalid token was provided. then you authenticated successfully.
Registering Listeners
Discord's API allows to you to listen to a wide variety of events. For example, you can listen to messages, users joining/leaving, and so on. For our purposes, we will only be listening to when the bot is ready to go, and when a user interacts with the bot using a slash command.
Ready Listener
Inside the src directory, create a new directory called listeners. Inside this directory, create a new file called ready.ts. Add this to the file:
TYPESCRIPTimport { Client } from "discord.js";

export default (client: Client): void => {
    client.on("ready", async () => {
        if (!client.user || !client.application) {
            return;
        }

        console.log(`${client.user.username} is online`);
    });
};
Back in Bot.ts, import the ready listener and register it with the client:
TYPESCRIPTimport { Client, ClientOptions } from "discord.js";
import ready from "./listeners/ready";

const token = ""; // add your token here

console.log("Bot is starting...");

const client = new Client({
    intents: []
});

ready(client);

client.login(token);
Run your bot again, and if all goes well, you should see the Bot is starting... message followed by the Bot is online message. Where Bot will be replaced with the name of your bot.
Interaction Create Listener
Now that we've added a listener for the ready event, let's do the same for the interactionCreate event. Create a new file called interactionCreate.ts and add this to the file:
TYPESCRIPTimport { BaseCommandInteraction, Client, Interaction } from "discord.js";

export default (client: Client): void => {
    client.on("interactionCreate", async (interaction: Interaction) => {
        if (interaction.isCommand() || interaction.isContextMenu()) {
            await handleSlashCommand(client, interaction);
        }
    });
};

const handleSlashCommand = async (client: Client, interaction: BaseCommandInteraction): Promise<void> => {
    // handle slash command here
};
This is where we will handle slash commands. What the listener function is doing is checking if the interaction is a command or a context menu. If it is a command, we'll call the handleSlashCommand function, which we will create later.
Like with before, add it to Bot.ts to register the event listener:
TYPESCRIPTimport { Client, ClientOptions } from "discord.js";
import interactionCreate from "./listeners/interactionCreate";
import ready from "./listeners/ready";

const token = ""; // add your token here

console.log("Bot is starting...");

const client = new Client({
    intents: []
});

ready(client);
interactionCreate(client);

client.login(token);
Defining a Slash Command
To start our slash command, we must first define the structure of a slash command. Let's define what a slash command looks like by creating a file called Command.ts inside the src directory, and add this to the file:
TYPESCRIPTimport { BaseCommandInteraction, ChatInputApplicationCommandData, Client } from "discord.js";

export interface Command extends ChatInputApplicationCommandData {
    run: (client: Client, interaction: BaseCommandInteraction) => void;
}
Let's break down what this file is doing. It is defining a type called SlashCommand. This type is a subtype of ChatInputApplicationCommandData, which is a type that represents a command that is sent. The run property is a function that will be called when the command is executed. We are given the client and the interaction that triggered the command so that we can properly respond to the user.
Writing a Slash Command
We'll be writing a simple slash command that will send a greeting when a user types /hello. This is the simplest example of a slash command, allowing you to later create more complex commands. To get started, create a folder called commands inside src. Inside this directory, create a new file called Hello.ts. Add this to the file:
TYPESCRIPTimport { BaseCommandInteraction, Client } from "discord.js";
import { Command } from "../Command";

export const Hello: Command = {
    name: "hello",
    description: "Returns a greeting",
    type: "CHAT_INPUT",
    run: async (client: Client, interaction: BaseCommandInteraction) => {
        const content = "Hello there!";

        await interaction.followUp({
            ephemeral: true,
            content
        });
    }
};
This file represents a simple slash command that will send a greeting when a user types /hello. The run function is called when the command is executed, and it will return a string with the contents Hello there!.
Centralize Slash Commands
Even though this bot will only have one slash command, it is still a good idea to centralize all of your commands in a single file. This will make it easier to manage your code and make it easier to add new commands. Create a new file called Commands.ts inside the src directory, and add this to the file:
TYPESCRIPTimport { Command } from "./Command";
import { Hello } from "./commands/Hello";

export const Commands: Command[] = [Hello];
This file represents all of the slash commands that the bot will have. It is an array of Command objects, that we can now use to cycle through all the existing commands to know which one was executed.
Registering Slash Commands
Now that we have defined our slash command, we need to register it with the client. We can do this inside the ready listener that we defined earlier. Import our commands and then set the commands, like so:
TYPESCRIPTimport { Client } from "discord.js";
import { Commands } from "../Commands";

export default (client: Client): void => {
    client.on("ready", async () => {
        if (!client.user || !client.application) {
            return;
        }

        await client.application.commands.set(Commands);

        console.log(`${client.user.username} is online`);
    });
};
With our commands registered, we just need to fill in our handleSlashCommand function to handle the slash command, and we're ready to go!
Handling Slash Commands
To handle slash commands, let's head back to our handleSlashCommand function inside interactionCreate.ts. Replace your empty function with this:
TYPESCRIPTconst handleSlashCommand = async (client: Client, interaction: BaseCommandInteraction): Promise<void> => {
    const slashCommand = Commands.find(c => c.name === interaction.commandName);
    if (!slashCommand) {
        interaction.followUp({ content: "An error has occurred" });
        return;
    }

    await interaction.deferReply();

    slashCommand.run(client, interaction);
};
Generate Bot Invite Links
Discord's bot invite links follow a specific format. They look like this:
BASHhttps://discord.com/api/oauth2/authorize?client_id={CLIENT_ID}&permissions={PERMISSIONS}&scope={SCOPE}
All you need to do is fill in you bot's client ID, the permissions bit, and the scope of the app.
- Get your bot's client ID by going to your Discord Developer Portal and clicking on the
OAuth2tab, thenGeneral. On the right side, you'll see your bot's client ID. - Get the permissions bit by going to your Discord Developer Portal and clicking on the
Bottab and at the bottom you will see the box calledBot Permissions. Click the permissions you want, and copy the number. - For scope, since this a bot, the value will be
bot%20applications.commands.
Here is a full example of the link:
BASHhttps://discord.com/api/oauth2/authorize?client_id={CLIENT_ID}&permissions=0&scope=bot%20applications.commands
Enter that URL into your browser and you should be able to invite your bot to your server. This is what that looks like:
 Discord bot invite
Select your server and your bot should join successfully.
Using a Slash Command
Now that your bot has joined your server, it is time to test it out. Make sure your bot is online. If it is not running, run it again.
BASHyarn start
Now you should be able to see your bot online in your server. Now try typing /hello in the chat.
Slash command in chat
When you press enter, you should see your bot reply to you in chat.
Discord bot reply in chat
If you're happy with your Discord bot, and want to deploy it on Docker, read our How to deploy a Node app using Docker tutorial. You can deploy your Discord bot in production very easily once you've deployed it using Docker.
Conclusion
In this tutorial, we've covered how to create a Discord bot, how to register slash commands, and how to handle them. We also went over how to generate invite links for your bot, and how to test the bot out in your own server. We hope that this tutorial has helped you learn how to create a Discord bot using TypeScript and discord.js.
Resources
 Getting Started with Solid
 Managing PHP Dependencies with Composer
 Git Tutorial: Learn how to use Version Control
 How to Set Up Cron Jobs in Linux
 Best Visual Studio Code Extensions for 2022
 How to deploy a Node app using Docker
 Getting Started with Handlebars.js
 Build a Real-Time Chat App with Node, Express, and Socket.io
 Getting Started with Moment.js
 Using Push.js to Display Web Browser Notifications
 Setting Up Stylus CSS Preprocessor
 Setting Up a Local Web Server using Node.js