Table of Contents
Let's learn how to create a form with the form tag, how to collect user input using the input tag, the different types of input tags, and how to submit the form.
Forms
When you want to collect data from your users, forms in HTML are a great way to accomplish that. The surrounding tag for forms is the form tag. In addition, it will require two attributes, the action attribute and the method attribute.
Action
The action attribute is simply the location that the information from the form is being sent to. The value of this attribute will therefore be a URL of some kind. The action attribute is optional, but if you want to make sure that the information is being sent to a specific location, you should set it.
Method
The method attribute defines how the form is going to send the information. The two most used values for this attribute is get and post.
If you try doing a Google search, and look at the URL at the top afterwards, you will see the text you typed before hitting search. This is an example of get. Using get will make the data inputted in a form get appended to the end of the URL.
On the other hand, using post will still send the data like get, but the only main difference is that you will not see it in the URL. Using post is recommended for submissions that require heightened security like passwords and personal information.
Put it all together, and you get this form:
HTML<!DOCTYPE html>
<html>
    <head>
        <title>Forms</title>
    </head>
    <body>
        <form action="destination" method="get">
        </form>
    </body>
</html>
While that is a completely valid form, without any way for the user to input or submit data, it is essentially useless on its own. We'll explore the many ways in which you can collect data from the user.
Textarea
Textareas are multiple-line text boxes where you can input text. They support multiple lines of text with optional attributes to control the size of them, the rows and cols attributes. The rows attribute defines the number of rows that the textarea will have, and the cols attribute defines the number of columns that the textarea will have.
HTML<textarea rows="8" cols="64">This is the initial value.</textarea>
 Textareas are boxes of text.
Select
Select boxes is a dropdown menu where you can select one of the options. They are used to select a single option from a list of options.
The select tag is the outermost tag, and inside you can define the options to choose from, using the option tag.
Let's look at an example:
HTML<p>Favorite color?</p>
<select>
    <option>Red</option>
    <option>Blue</option>
    <option>Green</option>
</select>
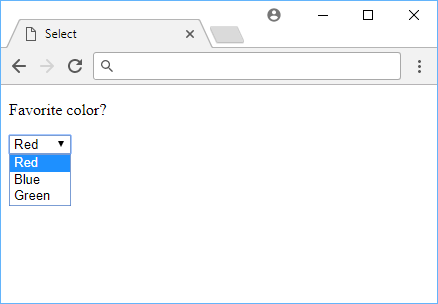 Select with 3 options.
If you would like an option to be selected by default, you can add a value-less selected attribute.
For example, if you wanted Blue to be pre-selected, you would do this:
HTML<p>Favorite color?</p>
<select>
    <option>Red</option>
    <option selected>Blue</option>
    <option>Green</option>
</select>
Option Groups
If your options feel better if they were grouped together, you can use the optgroup tag, with its accompanying label attribute. Here's a simple example of it:
HTML<p>Favorite color?</p>
<select>
    <optgroup label="Dark Colors">
        <option>Brown</option>
        <option>Black</option>
        <option>Purple</option>
    </optgroup>
    <optgroup label="Light Colors">
        <option>Yellow</option>
        <option>White</option>
        <option>Pink</option>
    </optgroup>
</select>
 Option groups can be useful.
Input Element
The input element is the most commonly used element inside HTML forms. The input tag can turn into many different things due to its versatile type attribute. Since this tag doesn't surround any content, it does not require a closing tag.
Let's go through all of the main types.
Text
When type is set to text, it will be a single-line textfield. It will accept any text input.
HTML<input type="text">
The value attribute is used to set the default value of the textfield. For example, if you wanted to set the default value to "Hello World!", you would do this:
HTML<input type="text" value="Hello World!">
Password
When type is set to password, it functions the same as if type is set to text, except that any text inputted will be visually overridden by dots or stars as you would expect when entering a password. It is recommended that you use this type of input when you want to collect sensitive information.
HTML<input type="password">
Checkbox
When type is set to checkbox, it becomes a checkbox that has two states. A checkbox can either be checked and not checked.
HTML<input type="checkbox">
You have the option to give this a value-less checked attribute, which will set the initial state of the checkbox to be checked.
HTML<input type="checkbox" checked>
Radio
When type is set to radio, it turns it into a radio button, which is similar to a checkbox except that only one option can be selected in a group of them.
HTML<input type="radio">
Number
When type is set to number, it turns into a single-line input field where you can select a number. You have optional min and max attributes to constrain the value to a certain range. For example, if you wanted to constrain the number to be between 1 and 10, you would do this:
HTML<input type="number" min="1" max="10">
Submit
When type is set to submit, it becomes a button that, when clicked, submits the form to the destination defined in the action attribute.
HTML<input type="submit">
The optional value attribute defines the text displayed on the button. For example, if you wanted to submit the form with the text "Submit", you would do this:
HTML<input type="submit" value="Submit">
 There are many more input types.
Button
The last input type in the list above was submit, which is the button the user presses to submit the form. However, there is another way to make a generic button that can do whatever you want (sometimes requiring a little JavaScript).
For example, with the button tag, you can easily make a button the resets the form to its initial values by giving it a type attribute with the value of reset.
HTML<form action="/destination" method="get">
     <button type="reset">Reset Form</button>
</form>
In general though, you can just make a generic button like this:
HTML<button type="button">I currently do nothing!</button>
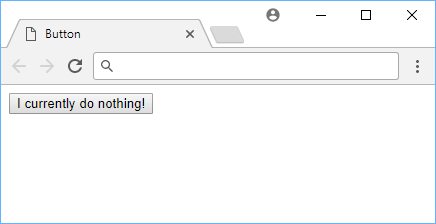 An HTML button that does nothing.
If you gave the button an onClick attribute, it will run JavaScript once pressed.
HTML<button type="button" onclick="doSomething();">I currently do something!</button>
In this case, it will run a function called `doSomething()```
Required
Required is an attribute you can add to any of the aforementioned tags that will make giving it a value required for form submission.
For example, if you tried to submit the following form:
HTML<!DOCTYPE html>
<html>
    <head>
        <title>Forms</title>
    </head>
    <body>
        <form action="/destination" method="get">
            <input type="text" required>
            <input type="submit" value="Submit this Form">
        </form>
    </body>
</html>
Without giving it a value, the browser will automatically prevent all submission attempts until the user inputs something in the tags given the required attribute.
This is useful for things like account registration where you need a username/email and password to proceed.
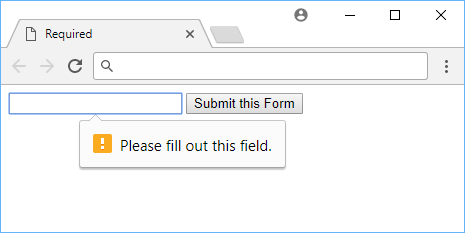 You need to enter a value for required inputs.
Labels
When it comes time to submit the data, you will want to use the the name attribute. The name attribute is used to identify the data in the form.
Add one like so:
HTML<input type="text" name="username">
Or this:
HTML<input type="password" name="password">
After you have given the tags name attributes, it is also good practice to give them visible labels, using the label tag.
Using our above examples, using label can look like this:
HTML<label for="username">Please enter your username:</label>
<input type="text" name="username">
HTML<label for="password">Please enter your password:</label>
<input type="password" name="password">
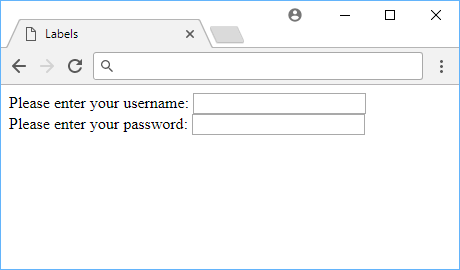 They help the user tremendously.
Field sets and legends
With field sets and legends elements, you can give labels to groups of tags, using the fieldset tag to group them, and the legend tag to label it.
For example:
HTML<fieldset>
    <legend>Name</legend>
    <label for="first">First Name:</label>
    <input type="text" name="first">
    <label for="last">Last Name:</label>
    <input type="text" name="last">
</fieldset>
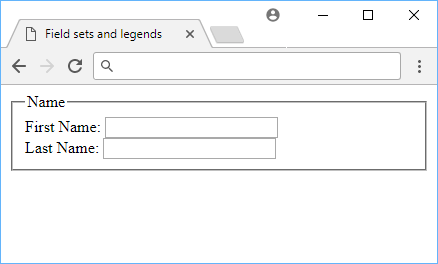 Example of field sets and legends.
Submitting
Submitting the data you have collected can be processed by the server. The action attribute defines where the data will be sent, and so a server will receive it and process it.
Resources
 How to Install Node on Windows, macOS and Linux
 Getting Started with Svelte
 Getting Started with Express
 How to Set Up Cron Jobs in Linux
 How to deploy a .NET app using Docker
 Learn how to use v-model with a custom Vue component
 How to Scrape the Web using Node.js and Puppeteer
 Getting Started with Handlebars.js
 Getting Started with Moment.js
 Getting Started with React
 Setting Up a Local Web Server using Node.js
 Using Axios to Pull Data from a REST API