Table of Contents
In the same way that the server can store information about an individual user, the browser, too, can store information. One way to do this is with the use of cookies. Cookies are small pieces of information that are stored on the user's computer.
 Cookies are nice.
Cookies are a great way to store data about a user on their machine, which you can retrieve whenever you want and perform some action on it.
For example, you can use cookies to remember preferences from the user, displaying their name, or show the last time they visited the website.
Cookies are strings of key/value pairs in a comma-separated list, and therefore requires a bit of work on our end to manipulate them safely. We'll cover this in more detail in the next section.
Creating a Cookie
Creating a cookie is as easy as setting the value of document.cookie to a string.
Because the string cannot contain any spaces, commas or semicolons, we use the escape() function which removes all of that for us. We also need to add the ; at the end of the string, which tells the browser that the cookie is finished.
HTML<!DOCTYPE html>
<html>
    <head>
        <title>Creating a Cookie</title>
    </head>
    <body>
        <script>
            function createCookie(key, value) {
                const cookie = escape(key) + "=" + escape(value) + ";";
                document.cookie = cookie;
                console.log(cookie);
                console.log("Creating new cookie with key: " + key + " value: " + value);
            }
            createCookie("sport", "basketball");
            createCookie("icecream", "vanilla");
        </script>
    </body>
</html>
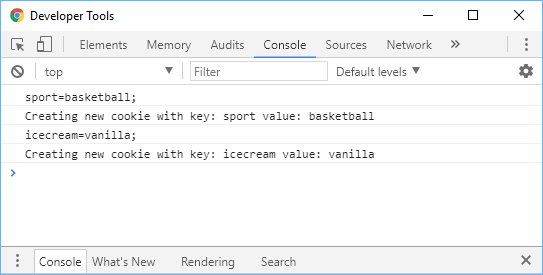 Output of creating cookies.
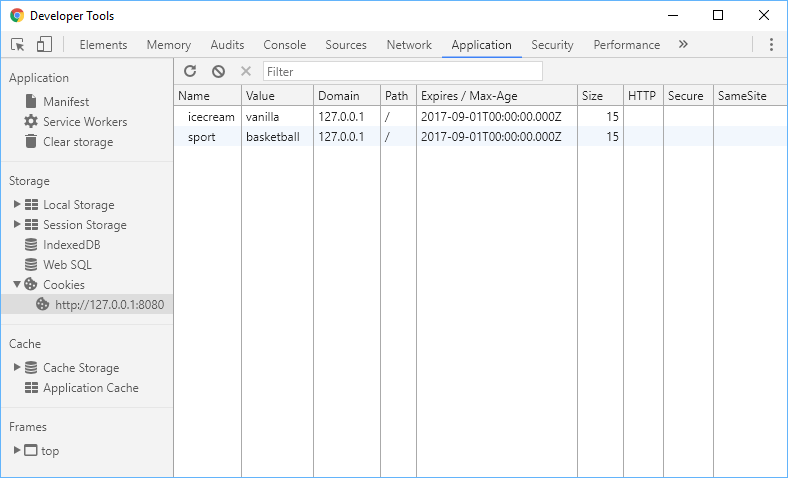
We created two cookies successfully, and you can check that claim by heading over to the Application tab and checking under Cookies.
 List of cookies in the Application tab.
Great, so we create two cookies, but look under Expires / Max-Age, you'll see the word Session.
What this means is that the cookie will only remain for as long as the user doesn't close the browser window and end the session. Sometimes, you want cookies to remain even after they have ended the connection.
To accomplish this, you have to set a custom expiration date.
Setting an Expiration date on Cookies
Setting the expiration date on cookies is as simple as giving the cookie a key/value pair where the key is expires and the value is when you want that cookie to expire.
Replace the contents of your script tag with this:
JAVASCRIPTfunction createCookie(key, value, date) {
    const expiration = new Date(date).toUTCString();
    const cookie = escape(key) + "=" + escape(value) + ";expires=" + expiration + ";";
    document.cookie = cookie;
    console.log(cookie);
    console.log("Creating new cookie with key: " + key + " value: " + value + " expiration: " + expiration);
}
createCookie("sport", "basketball", Date.UTC(2017, 8, 1));
createCookie("icecream", "vanilla", Date.UTC(2017, 8, 1));
 List of cookies in the Application tab.
When you check the Applications tab, you should now see the same cookies created before, but now they have expiration dates, set to expire on September 1st, 2017, in this case.
Reading Cookies
Reading cookies takes a bit of work because of the format they are stored in. We'll have to use some string manipulation to read them properly.
JAVASCRIPTfunction readCookie(name) {
    let key = name + "=";
    let cookies = document.cookie.split(";");
    for (let i = 0; i < cookies.length; i++) {
        let cookie = cookies[i];
        while (cookie.charAt(0) === " ") {
            cookie = cookie.substring(1, cookie.length);
        }
        if (cookie.indexOf(key) === 0) {
            return cookie.substring(key.length, cookie.length);
        }
    }
    return null;
}
Basically what this function is doing is using the split method to split up the entire cookie text into their individual key/value pairs. Then, it is checking each pair to see if it matches with the name provided. If it matches, it returns that value, if not, it returns null.
JAVASCRIPTfunction createCookie(key, value, date) {
    const expiration = new Date(date).toUTCString();
    console.log(expiration);
    const cookie = escape(key) + "=" + escape(value) + ";expires=" + expiration + ";";
    document.cookie = cookie;
    console.log(cookie);
    console.log("New cookie with key: " + key + " value: " + value + " expiration: " + expiration);
}

function readCookie(name) {
    let key = name + "=";
    let cookies = document.cookie.split(";");
    for (let i = 0; i < cookies.length; i++) {
        let cookie = cookies[i];
        while (cookie.charAt(0) === " ") {
            cookie = cookie.substring(1, cookie.length);
        }
        if (cookie.indexOf(key) === 0) {
            return cookie.substring(key.length, cookie.length);
        }
    }
    return null;
}

createCookie("sport", "basketball", Date.UTC(2017, 8, 1));
createCookie("icecream", "vanilla", Date.UTC(2017, 8, 1));

console.log(readCookie("icecream"));
HTMLFri, 01 Sep 2017 00:00:00 GMT
sport=basketball;expires=Fri, 01 Sep 2017 00:00:00 GMT;
New cookie with key: sport value: basketball expiration: Fri, 01 Sep 2017 00:00:00 GMT
Fri, 01 Sep 2017 00:00:00 GMT
icecream=vanilla;expires=Fri, 01 Sep 2017 00:00:00 GMT;
New cookie with key: icecream value: vanilla expiration: Fri, 01 Sep 2017 00:00:00 GMT
vanilla
And there you have it, we set a cookie with the key icecream and value vanilla, and then successfully read it.
Deleting Cookies
Deleting cookies is extremely easy. All you need to do is set a cookie's expires value to a date in the past. The browser will automatically handle the rest.
Using our previous function createCookie, deleting a cookie is as easy as this:
JAVASCRIPTfunction deleteCookie(name) {
    createCookie(name, "", -1);
}
The -1 for the cookie's expiration date ensures that the date is in the past, and therefore making the cookie already having expired. The value we pass in doesn't matter because the cookie is being removed anyways.
Resources
 Getting Started with Solid
 Git Tutorial: Learn how to use Version Control
 How to Serve Static Files with Nginx and Docker
 How to deploy a PHP app using Docker
 How to deploy a Node app using Docker
 Getting Started with Sass
 Getting Started with Handlebars.js
 Build a Real-Time Chat App with Node, Express, and Socket.io
 Learn how to build a Slack Bot using Node.js
 Getting Started with React
 Setting Up Stylus CSS Preprocessor
 Using Axios to Pull Data from a REST API