Table of Contents
Whenever a user interacts with the page, this action is considered an event. An example of an event can be a click, a hover, a page load, a keypress, and many others things.
Working with events is a large part of creating interactivity on your page.
Listening for Events
To perform an action when an event triggers, you first need to listen to it. Listening to an event is basically telling the browser "hey, when this event occurs, I want to execute this piece of code".
That piece of code is packaged in the form of a function called the callback function, and is provided to the browser.
The browser now listens for the event and once it occurs it will run the callback function, doing whatever it is that you want to happen.
Adding an Event Listener
The secret that makes this all work is the addEventListener function that is called on an element of your choosing.
The function takes the name of the event you want to listen to as the first parameter, and the function to run when that event happens as the second parameter.
Let's see this in action with a simple click event listener.
HTML<!DOCTYPE html>
<html>
    <head>
        <title>Click Event Listener</title>
    </head>
    <body>
        <button id="button">Click here for a console log!</button>
        <script>
            // first, get the button
            const button = document.querySelector("#button");

            // second, define what you want to happen
            const clickCallback = function(event) {
                console.log("You've clicked on the button!");
            }

            // third, add the event listener on the click event
            button.addEventListener("click", clickCallback);
        </script>
    </body>
</html>
HTMLYou've clicked on the button!
- HTML
- JavaScript
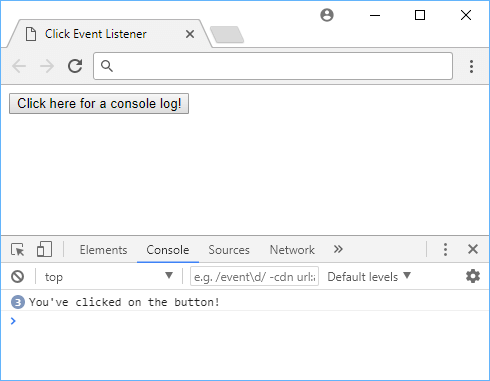 Clicking on the button three times.
By attaching an event listener to our button, the code defined inside clickCallback runs every time we click on the button.
In case you missed it, the callback function receives an object detailing what happened, and it's named event. Here is some of the data when you print out the object:
JAVASCRIPTconst clickCallback = function(event) {
    console.log("You've clicked on the button!");
    console.log(event);
}
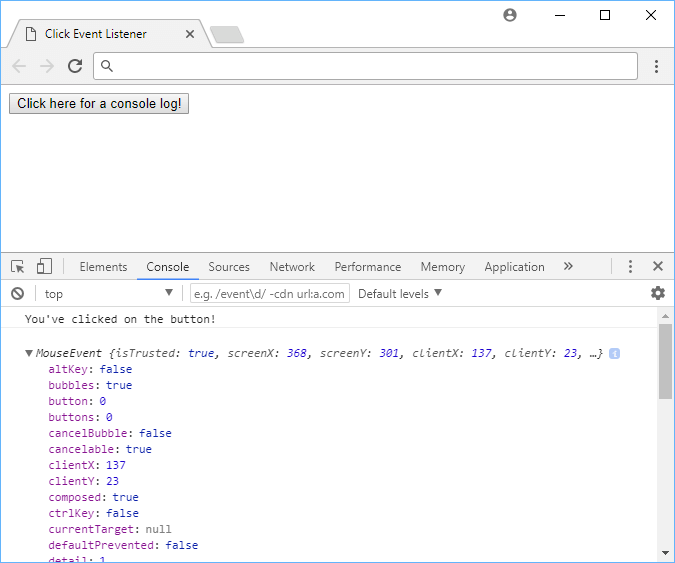 The MouseEvent has a lot of information.
With the information provided inside event, you can use it to customize the path your code takes inside the function.
Some useful information found in the Mouse Event object include:
type: What event occurred.timeStamp: When the event occurred.x: The x value of the point where the user clicked on.y: The y value of the point where the user clicked on.target: What element was the targeted element.
Inline Event Listeners
An alternative way to accomplish the above is by using inline event listeners. That is, to give elements special attributes that the browser can interpret to then run your code whenever an event fires.
HTML<!DOCTYPE html>
<html>
    <head>
        <title>Click Event Listener</title>
    </head>
    <body>
        <button id="button" onclick="clickCallback()">Click here for a console log!</button>
        <script>
            function clickCallback(event) {
                console.log("You've clicked on the button!");
            }
        </script>
    </body>
</html>
HTMLYou've clicked on the button!
We gave the button element an onclick attribute, with the name of the function we want executed inside and the browser took care of the rest.
More Native Events
A click event isn't the only event you can listen to. There are many events you can choose from to create some really great experiences.
click: When the element has been clicked.keydown: When the user presses down on a key.change: When the element has changed.mouseover: When the element is hovered over.mouseout: When the element is no longer hovered over.mousemove: When the mouse moves while hovered over the element.load: When the document or element has finished loading.
Custom Events
In addition to the native browser events, you can define, dispatch, and listen to your own custom events. This allows you to create some pretty unique functionality. Let's say you want an event for eating food:
JAVASCRIPTconst event = new Event("eat");

element.addEventListener("eat", function(event) {
    console.log("Eating food!");
}, false);

element.dispatchEvent(event);
The first bit defines a new event with the name eat. The second bit adds an event listener for that event, and so when that event is fired, the callback function is executed. The last bit is the line of code that dispatches, or fires, the event. Once fired, the listener will pick up on it and run the callback function, logging Eating food! to the console.
Resources
 How to Install Node on Windows, macOS and Linux
 Getting Started with Express
 Create an RSS Reader in Node
 How to deploy a .NET app using Docker
 How to build a Discord bot using TypeScript
 How to deploy a PHP app using Docker
 How to deploy a MySQL Server using Docker
 Getting Started with Handlebars.js
 Learn how to build a Slack Bot using Node.js
 Getting Started with React
 Setting Up Stylus CSS Preprocessor
 Using Axios to Pull Data from a REST API